David Brown is a farrier, based in Perthshire, with decades of experience in shoeing horses and fabricating metal.
In recent years, he’s been delighting family and friends with craftwork, whether wood-fires, garden ornaments or house-signs, all made from a collection of rods, plates and cylinders.
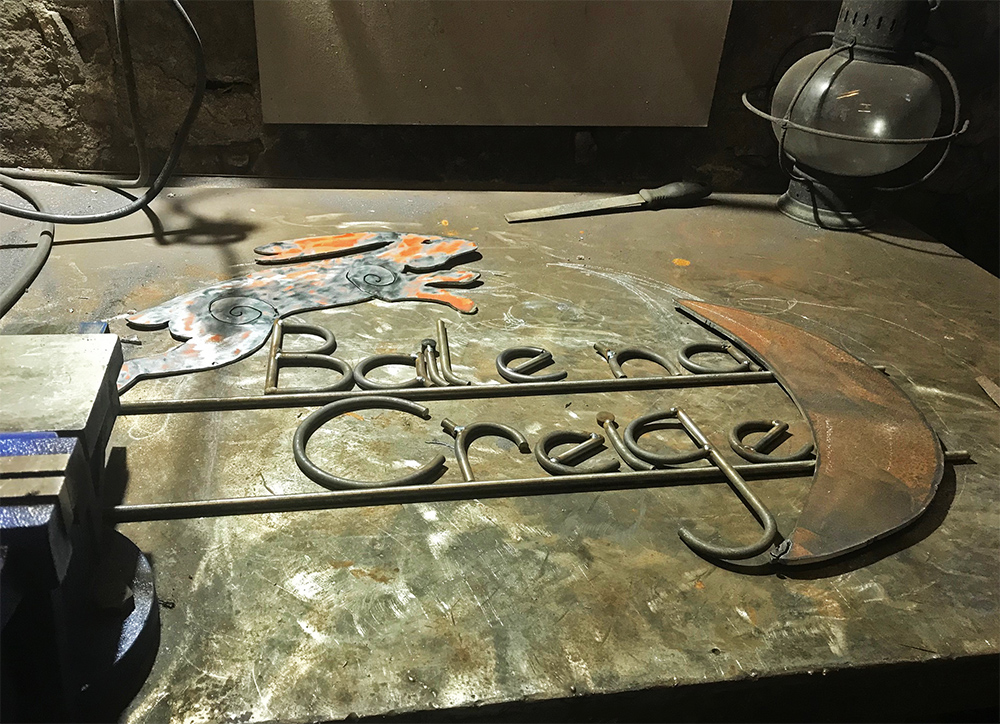
Examples of his work can be seen online [1] . The photograph below shows some of the parts being combined to make a house-sign .
Earlier in February, the Living Field went to find out how David works the metal into lettering and complex shapes of plants and animals.
It’s all done at a workshop within an old stone outbuilding in the Braes of the Carse between Dundee and Perth.
Firing scrap
The first thing noted was that the raw materials are mostly from unwanted or scrap metal. Take the rods, tied in bundles in the photograph above. They became unfit for their original purpose in the construction industry and would have been thrown away. Yet they are ideal for making things like ornamented pokers and lettering.
To become malleable, the rods are first fired in the forge until white hot, then the hot end is placed on the anvil ready for the hammer.
The end of a white hot circular rod was beaten with a hammer into an oblong (top left), which was then cut with a hand-held circular saw (top right) to form a sort of ‘tuning fork’; the rod was reheated and the prongs bent in various ways (right middle and lower). Another rod was left uncut, but twisted into a spiral around itself (lower middle and left) to form the holding end of a poker or similar implement.
Hammering, sawing, bending, twisting
A range of techniques can used to create shapes out of the fired rods. First, the rods are usually beaten with a hammer to ‘flatten’ the last few inches of the rod into an oblong.
When cool, the flattened ends can be cut with a circular saw to form two prongs, like a tuning fork. The rod then goes back in the forge until it’s white hot again and in this form, the two prongs can be bent or hammered into shape.
Or the white hot rod can be left as a cylinder, but twisted round a ‘plug’ inserted into the anvil or held in a vice and curled into a spiral.
Demonstration of the plasma cutter: the shape of a horse’s head was drawn on a strip of metal 10 cm wide and about 1 cm thick; one end of a circuit was clamped on the metal; the cutter was turned on and moved over the outline, cutting through the metal with ease. It only took a minute or so from start to finish.
Power of the plasma cutter
Shapes are usually made from discarded steel or iron plate. An outline is drawn on the metal, then a hand-held plasma cutter traces the shape to release it from the plate. A powerful thing, this plasma cutter ….. and it makes a cascade of sparks!
The shape can then be re-heated and bent, cut or hammered to add spirals and other patterns.
From discard to craftwork
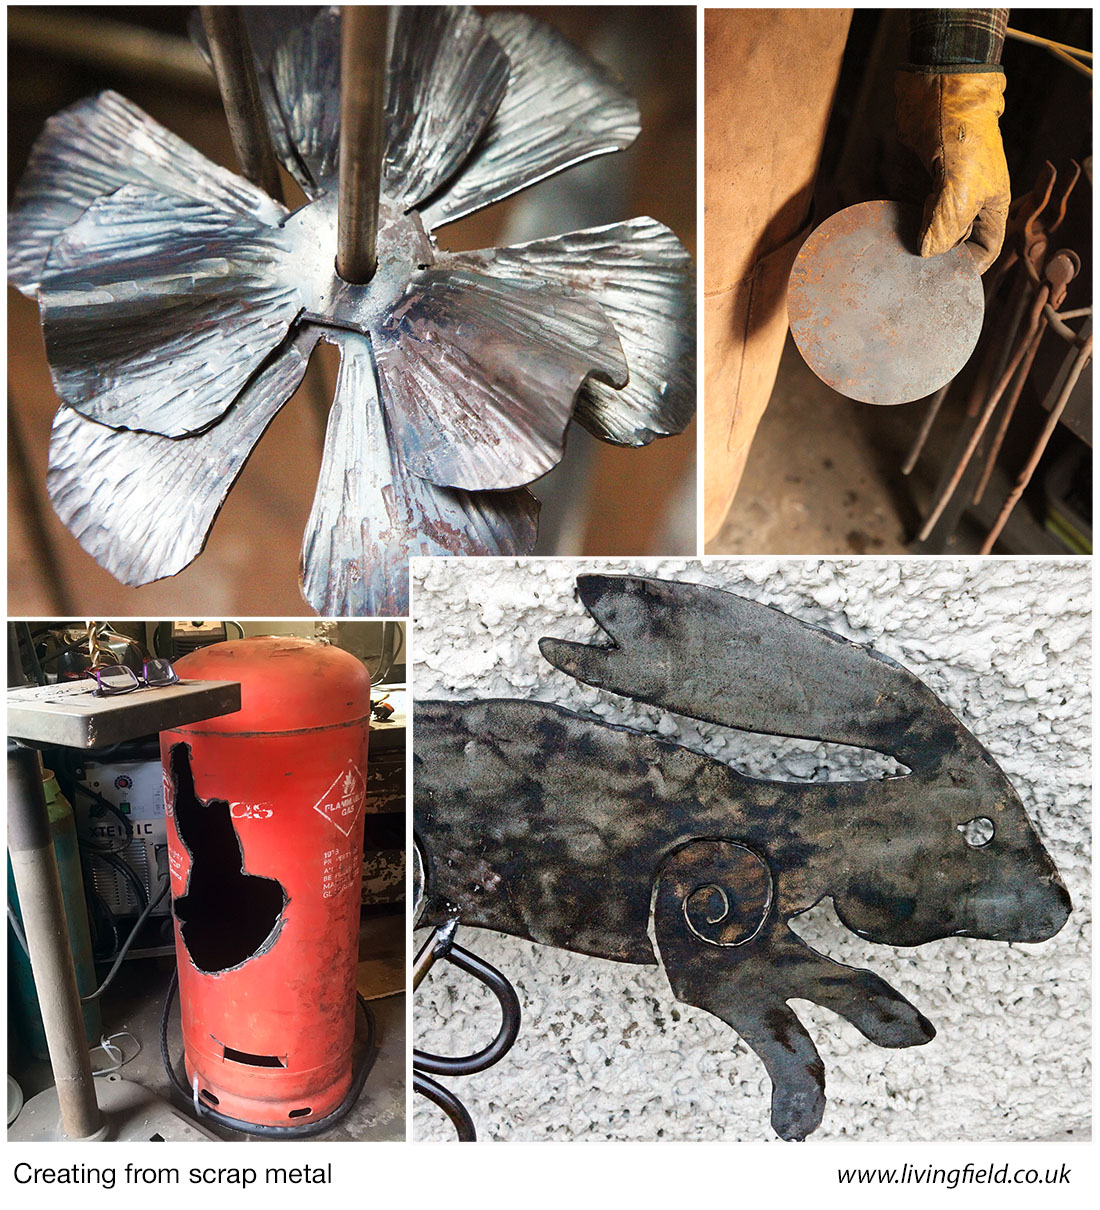
It was heartening to see David’s positive efforts to turn waste metal into things useful and ornamental. Here’s two examples.
In the panel above, discarded metal discs (top right) were first cut radially into several segments, some taken out to near the centre, those remaining moulded into the form of leaves or petals, given texture by repeated blows from a special hammer. When aligned on a central rod, the discs combine into whorls of leaves or flowers.
In the lower photographs, metal was taken from an old calor gas cylinder, flattened and cut into the form of a hare.
The workshop is a place of fire, sparks, hammering and hot metal – amazing to see it all. And there is little duplication: each piece is hand made and unique.
In my practice as a textile artist, I work largely with wool – a fibre which has been used since the dawn of civilisation. It was almost certainly one of the earliest fibres to be used in the manufacture of cloth. Its continued use right through to modern times is testament to its usefulness.
My own development as an artist has been very much influenced by happenings and circumstance rather than a planned progression, and living in the Highlands of Scotland means that wool is the fibre that just happened to be available at times when I wanted to explore a different route.
My mother had taught me to sew at an early age – or as she described it, she allowed me to have needle, thread and scissors – and although I have no memory of it, I could sew before I could read. Adding decoration to fabric in the form of embroidery or the addition of braids seemed to just come naturally. I was 10 before my legs were long enough to reach the foot pedal of my mother’s sewing machine, but once I got going with that, there was no stopping me – machines were the way to go! After a year away from home at university with no access to a sewing machine, I spent all my summer holiday earnings on my own machine, and have never looked back.
Broadening my skills
I was given a small table-top loom by my father when I was 15 – just a happy result of him being in the right place at the right time when a colleague was doing some down-sizing. As this was decades before the advent of the internet, I made a trip to the local library to find a book on weaving and from that figured out what to do with the loom. A friend with a knitting machine gave me a cone of Shetland yarn to weave with and I was off…….
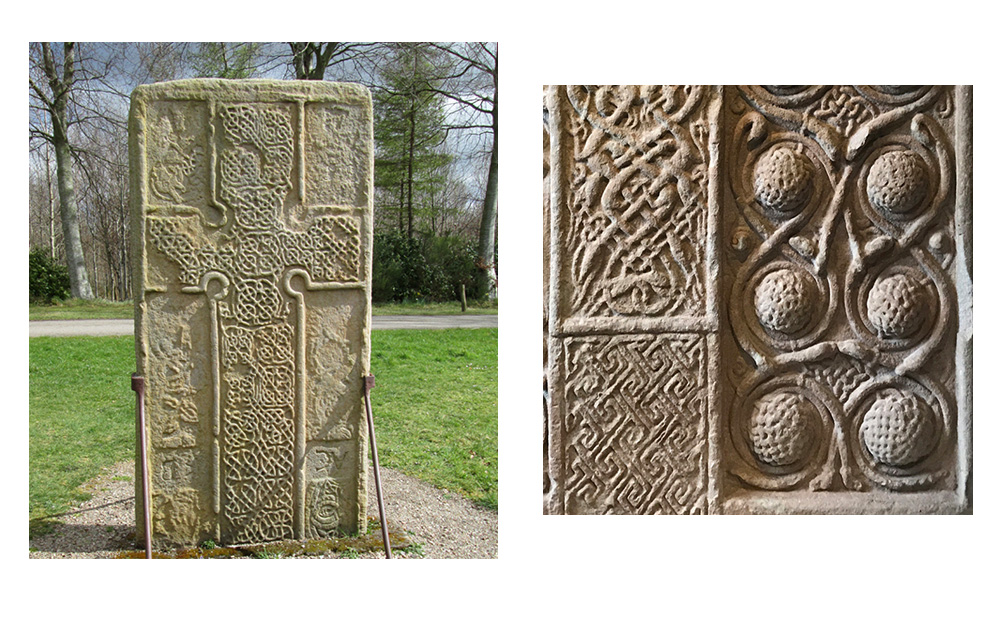
Pictish cross slabs, 9th century: left, Rodney’s Stone, which stands near the entrance to the grounds of Brodie Castle in Moray; right, a detail from the Nigg stone, Easter Ross. All photographs by Ruth Black.
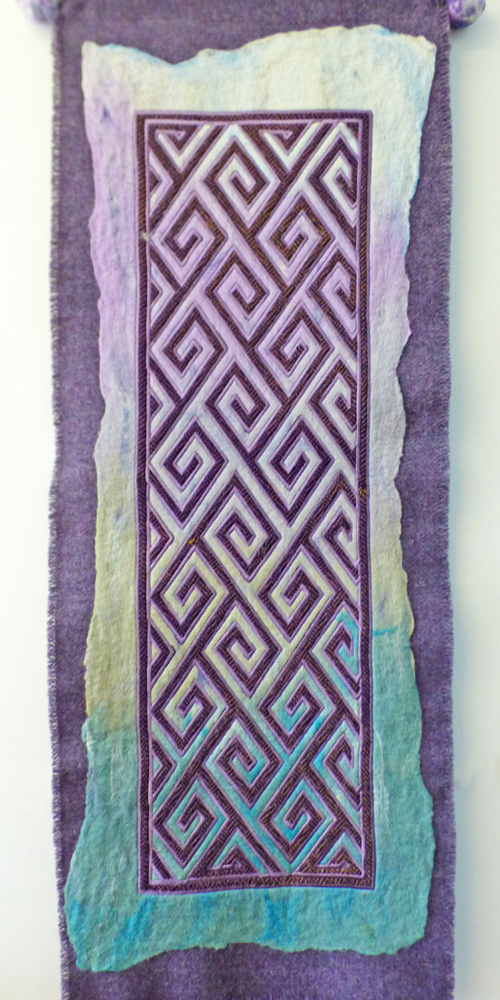
Wall hanging, inspired by the Nigg stone – hand-made felt, Harris Tweed and embroidery (40 x 120 cm).
Over a couple of decades I was just a serious amateur sewer and weaver with occasional forays into machine knitting, hand spinning and various other textile techniques as and when time allowed, but in the early 90s I stumbled into the world of Pictish sculptured stones. As a design style, this really captured my imagination and figuring out ways to incorporate this art form in my embroidery resulted in me getting commissions for my work. And of course, the more I was asked to do, the more I was able to let my art develop and after a few years, I got to the stage where I was able to give up my day job as a school science technician.
Going professional
My mother had a small part-time business [1] making hats with Harris Tweed. (She started this because of taking early retirement and moving to the Isle of Lewis. The wind blows there, so warm hats were needed!) I helped her out whenever she was busy with orders, so Harris Tweed was always around and available for me to experiment with. The combination of Harris Tweed and Pictish design works really well and I discovered there was a market for my style.
Harris Tweed hat from the Anna Macneil range.
Once I started working professionally I found I was able to invest in equipment that not only saved me time, but allowed me to develop my style in ways that had not previously been possible.
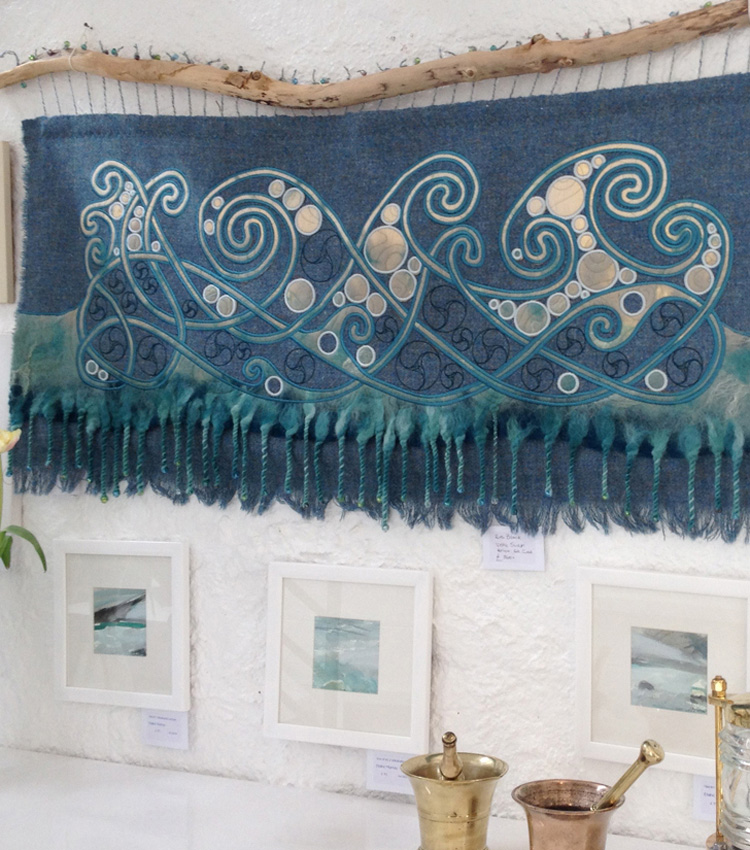
‘Celtic surf’ – wall hanging on display at Morven Gallery on the Isle of Lewis – hand-made felt, Harris Tweed and machine embroidery (110 x 50 cm)
Embroidery machine
It was 2001 when I bought my first embroidery machine – a tiny domestic model that was very limited in terms of scale, but opened my eyes to the possibilities of what could be achieved with a machine so I saved up, and a couple of years later bought an industrial machine. And a couple of years after that, I added a bigger one………. Studio space prevents me from going bigger still. Two machines running side by side is all I have room for.
Laser cutter
The technique I developed for all my Celtic/Pictish inspired work is appliqué. This involves cutting out shapes of fabric, placing it on the background fabric and stitching over the cut edges. At first, this was all done with a scalpel on a cutting board, but it was a slow process that put a strain on my wrist, so when I discovered about laser cutters………. yes, it might be the same cost as a new family car, but I did the sums and figured out that it could pay for itself within 5 years so a bank loan was worthwhile. Speed and comfort are not the only benefits. Wool is a mobile, flexible fabric. As the laser does not actually touch the fabric at any time there is no distortion in the cutting process. The laser works by burning along a very finely focussed line and gives a sealed edge as the fibres burn away. In the case of wool this gives a slightly tarry, charred edge but this is later concealed by the stitching that goes over it. The down side is that my studio can sometimes smell a bit like a charnel house, but the smell quickly dissipates.
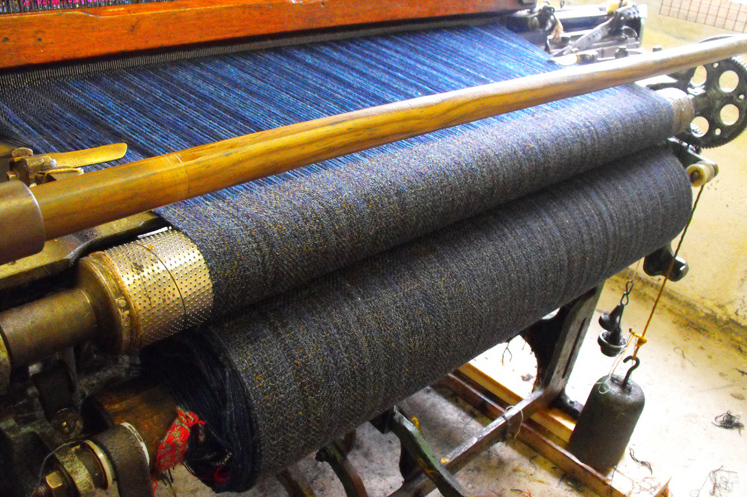
Weaving in progress on the Hattersley loom
Looms
Family circumstances meant I was spending a lot of time going to Lewis for a few days every month. As a change from my embroidery I decided that while on Lewis I should improve my weaving skills. I managed to acquire an old Hattersley loom (and a shedful of Harris yarn to go with it) and set it up in my mother’s garage. It took a while, but I did get to the stage where I was weaving Harris Tweed and getting it stamped with the official Orb certification mark. The image below right shows an Orb design embroidered on my own weaving.
Orb mark that certifies a piece of cloth is genuine Harris Tweed (official stamp just visible top right)
Wool is a lovely yarn to weave with, and almost all the weaving I have done over the decades has been with wool. It is a “forgiving” fibre. It has a degree of natural elasticity that makes it easy to weave with, and also easy to disguise mistakes and breaks. When it first comes off the loom it is quite hard and rough, but at this stage, careful examination gives the weaver a chance to do any necessary darning and once the tweed is washed you can’t tell where the problem was.
When my mother died I no longer had an island base for my loom so moved it to my studio near Inverness. Of course the weaving that I do here cannot be called Harris Tweed because for that the entire process has to be carried out in the Outer Hebrides, but I found that not all my customers were bothered about what the tweed was called – they were more concerned that it had been woven by me.
This year I decided I had had enough of the hard pedalling that was involved in operating the Hattersley loom and so I sold it on and invested in a new hand loom (photographs below) that has a computer dobby (the mechanism that lifts and lowers the shafts to separate the warp threads). This new adventure is allowing me to be much more experimental in my approach to weaving, and to use a wider variety of yarns. The gentler technique will also allow me to weave with my own hand spun yarns, so watch this space….!
Threading and tying in a new warp on the Toika loom
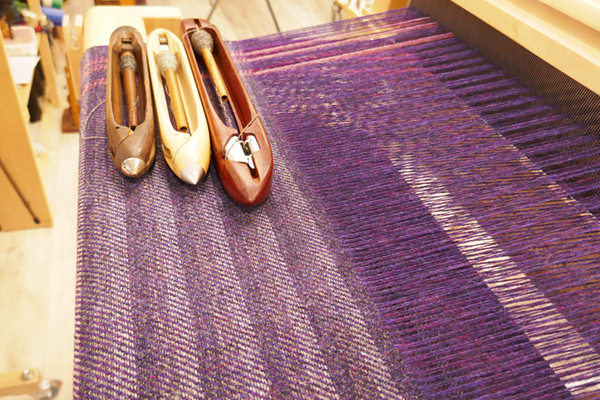
Wool tweed weaving in progress on the Toika loom
Computers
With the exception of my sewing machines, all my equipment needs a computer to run. I now find that I design straight onto the computer most of the time, though I often do quick sketches with pencil and paper just to work out which way I am going to take a bit of knotwork or key pattern work. Being able to do the simple processes of copy and paste, flip and rotate allows me to easily bring the precision to my work that is so important in Pictish art.
Detail of wall hanging inspired by knotwork on the Rosemarkie cross slab at Groam House Museum – machine embroidery on Harris Tweed
Low-tech techniques
Computerised technology has its place, and certainly makes it possible for me to create my art and sell it for prices that people can afford, but I do still use a lot of purely hand techniques. I weave braids and bands using a variety of methods – inkle weaving, tablet weaving and mini peg-loom. I often embellish little details of my machine embroidery with some hand stitching, beading or couching. I do a bit of hand dyeing and fabric painting, and quite a lot of hand spinning – mostly wool.
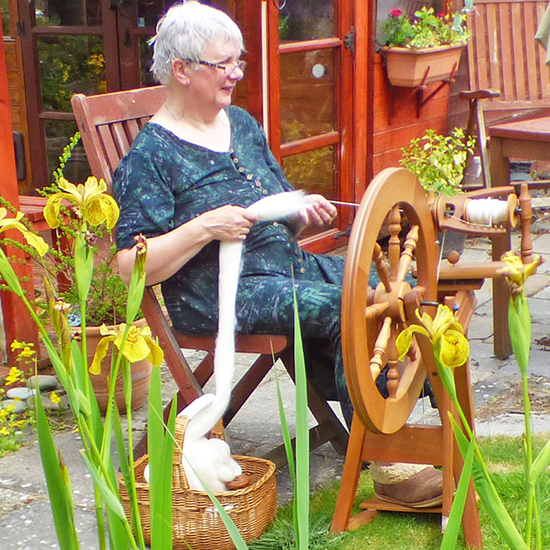
Ruth hand spinning in her garden
Felt making
In addition to working with woven fabrics – mostly wool and silk – I also make my own hand made felt. This is another ancient fabric making technique but it has only been in the last few decades that it has become a popular activity in Scotland. Unlike weaving and knitting, no yarn is needed – just loose wool fibres. It is basically a question of rubbing the wool fibres with soapy, warm water until they bind together – though of course things such as initial fibre preparation, the techniques used and the skill of the feltmaker all play their part in how the final product looks and handles.
An important feature of felt compared with woven and knitted fabrics is that it can’t be undone – once the fibres are felted, they can’t be separated. The advantage for my way of working in embroidery is that felt doesn’t fray so there is less need for full coverage of the cut edges in appliqué work. I also make use of the thickness of the felt to achieve a semi-relief look in some of my embroideries. Although the felt has to be made largely with wool, other fibres such as silk and bamboo can be added sparingly to give interesting surface textures.
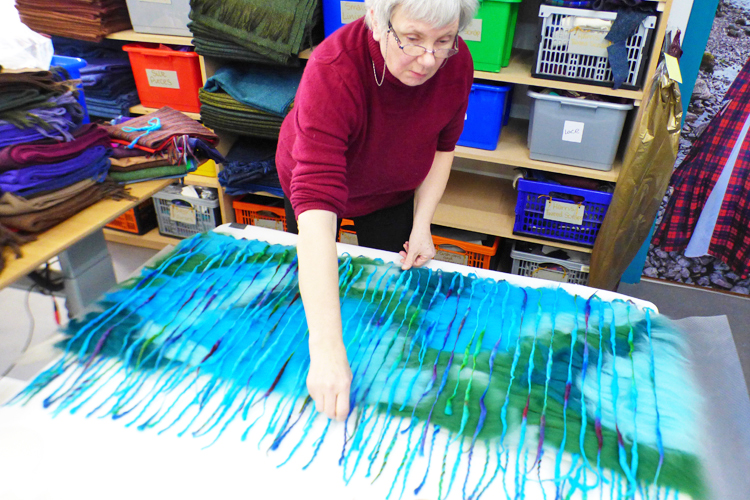
Laying out wool fibres prior to felting
Creating my own cloths, whether this is on the loom, the knitting machine or at my felting table, means that I can blend colours in a way that would be impossible with shop-bought fabrics. As I am creating the fabrics I am thinking about how I am going to use them. If I am making clothing I will weave, knit or felt just the amount I need to make a particular garment and will introduce colour changes as I go along. If I am planning a piece of wall art it may be that I let the fabric develop organically and then decide how I am going to embellish it once I have the fabric completed.
I don’t really sample. With weaving I might weave a small section in 2 or 3 different colours of weft before I start for real, but generally I rely on my decades of experience and am confident that something will turn out the way I had envisaged – and if not, there are always other ways I can use a piece of cloth. Nothing is wasted. And while it may take a while to sell a particular piece, there is always someone out there who likes it enough to buy it. I am also very lazy about record keeping, so don’t ask me to repeat something. I can do something similar, but it won’t be the same.
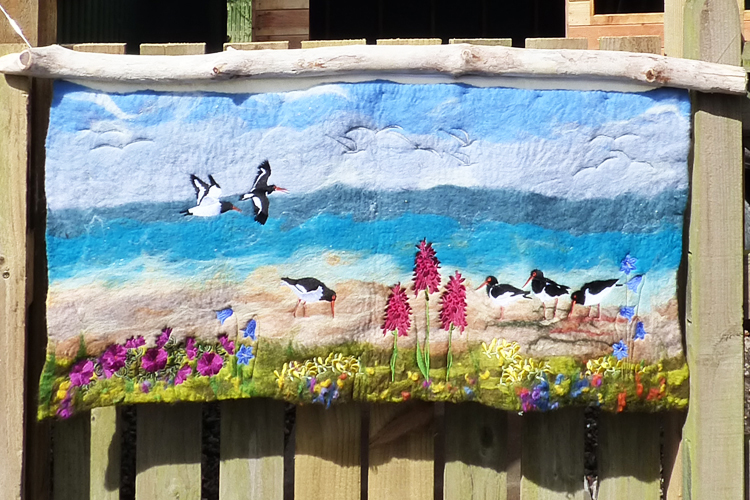
‘Machair’ wall hanging – hand made felt with machine embroidery (100 x 50 cm)
Inspiration
In terms of what inspires me…. just about everything! I am always seeing things and thinking, “That’s a nice shape, colour or texture, how can I work that into my art?” I suspect I will never grow tired of Pictish design. Sometimes I take the ancient designs and recreate them in my embroidery – other times I just take ideas from them but develop my own designs. The possibilities are endless and as even now, ancient sculptured stones are still being discovered, I don’t anticipate running short of inspiration – just the time to bring all my creative ideas into being.
The Future for Scottish Wool and Textile Art
Scottish wool has had its share of ups & downs. Currently sheep farmers are getting a lot less for their fleeces than it costs them to shear the sheep. But it is not that there isn’t a market for the wool. Now more than ever, people want to use natural fibres but the systems and manufacturing capabilities are not in place to connect producers and customers. The Harris Tweed industry relies on local wool. The Outer Hebrides wool clip is not enough to support the current level of tweed production, so wool is brought in from mainland Scotland. Most British wool gets used in carpet manufacture because it is considered too course and rough to wear – but these features make it excellent for walking on. It would also be ideal as house insulation (wool is naturally fire retardant!) and we are all being advised to better insulate our homes. We need a bit of joined up thinking.
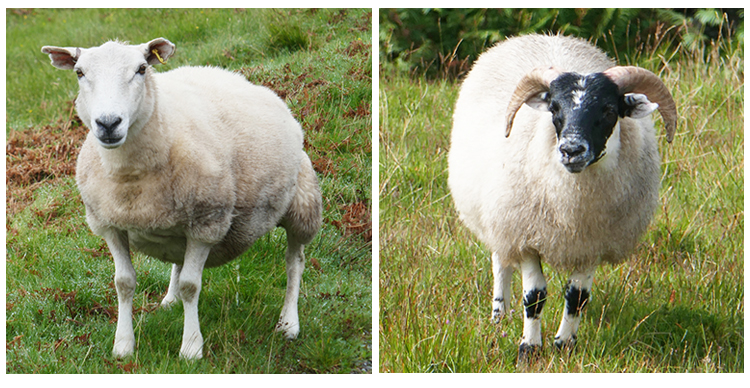
Sheep breeds: cheviot (left) and blackface
At the other end of the scale, some small scale farmers are making direct connection with textile enthusiasts who are happy to pay for nice fleece – particularly for some of the more interesting breeds.
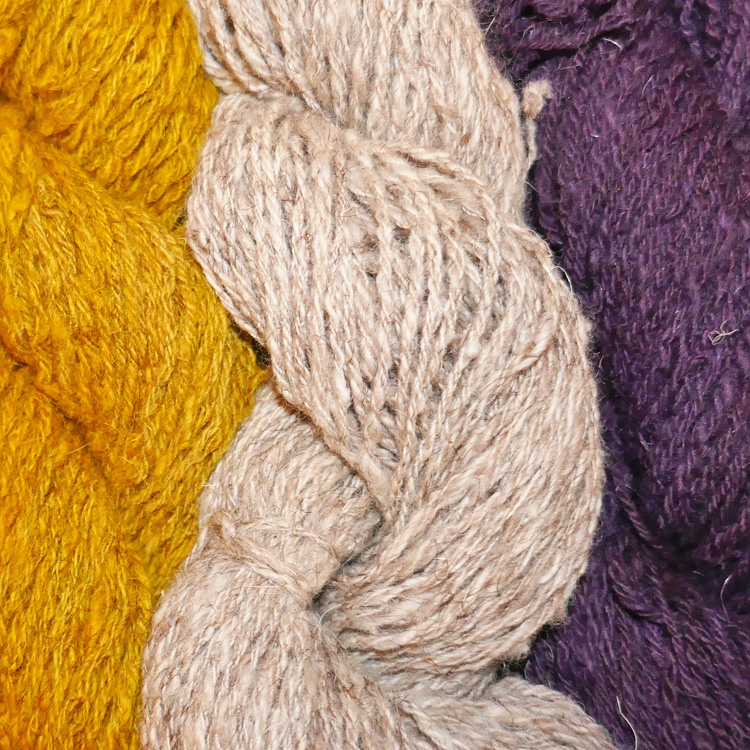
I am currently working on a long-term project that is entirely for my own amusement rather than with thought of finding a paying customer. I am spinning my way through a couple of kilos of North Ronaldsay fleece. Once it’s all spun and applied I will venture into the world of natural dyes and then start weaving.
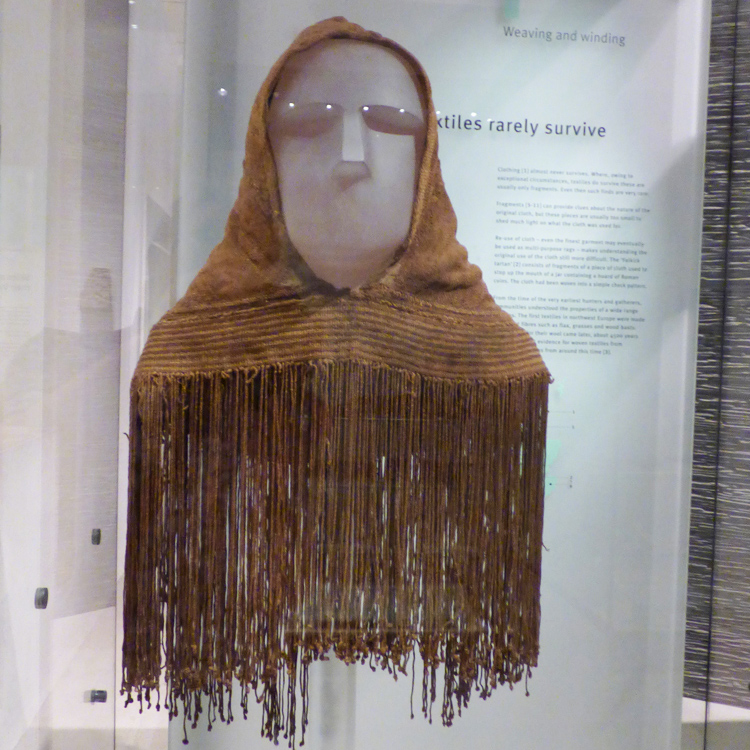
The Orkney Hood, 6th century, found in a peat bog in the 19th century and now on display in the National Museum of Scotland
My ultimate aim is to use a combination of tablet weaving and loom weaving to construct my version of the Orkney Hood. However, I want a finished garment that is soft and luxurious, not something that looks as though it has been in a peat bog for 1500 years! This project has been made possible by the covid pandemic. As the world went into suspended animation, I found myself more in control of my time. It is quite liberating to work without having to be concerned about the commercial aspect of what I am doing, but maybe as I work I will try to figure out if there is a viable way to make such garments for sale – and see if there is a demand for it.
Author | links
Hand spun North Ronaldsay wool – yellow is dyed with turmeric, the beige is undyed, purple is dyed with logwood
Ruth Black www.ruth-black.co.uk The Workshop, Inchmore, Inverness, IV5 7PX
01463 831567 // 0777 177 4172
ruth@ruth-black.co.uk
[1] For my Harris Tweed products I trade under the name of my mother’s business – Anna Macneil www.annamacneil.scot
All images on this page by Ruth Black.
Ed: many thanks to Ruth for giving the Living Field such insights to her art and craft based on natural fibres and providing the photographic material for this article.
Postscript
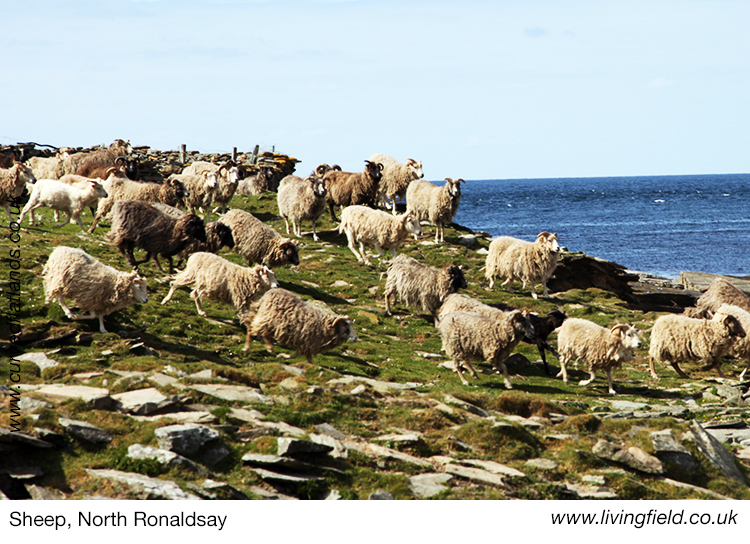
And here is a photograph of some North Ronaldsay sheep from the Living Field’s collection (added 7 February 2022)
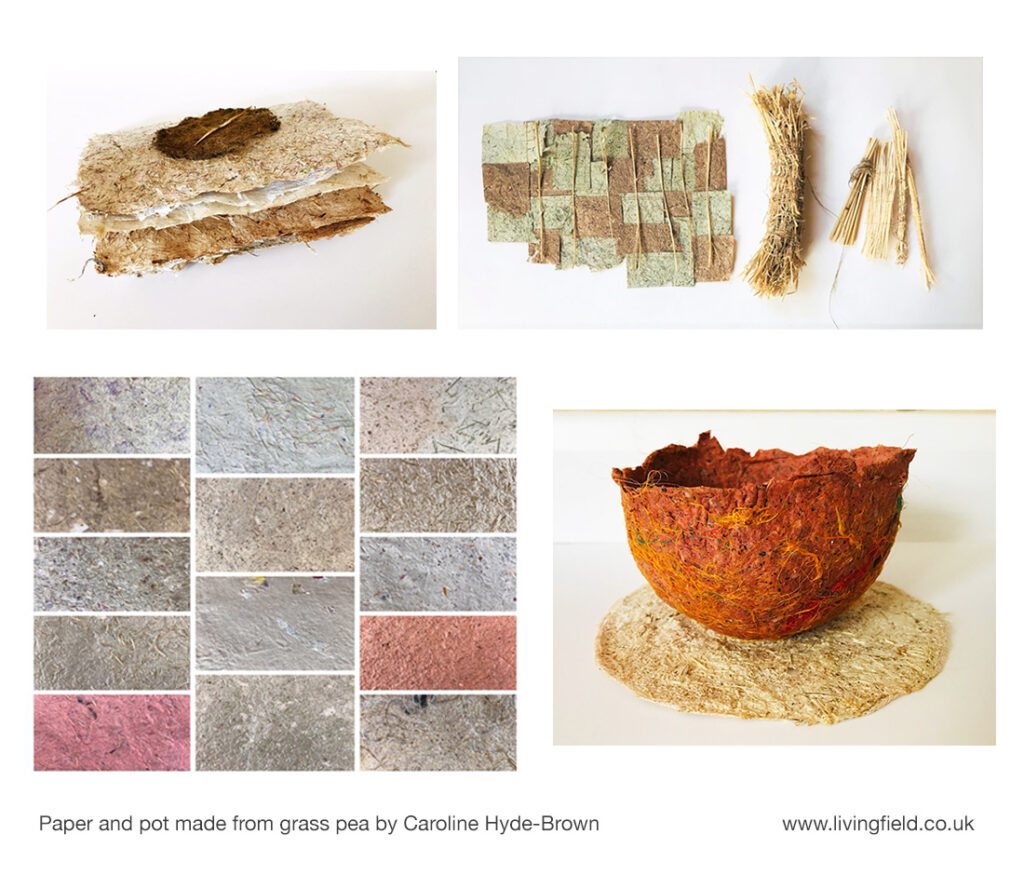
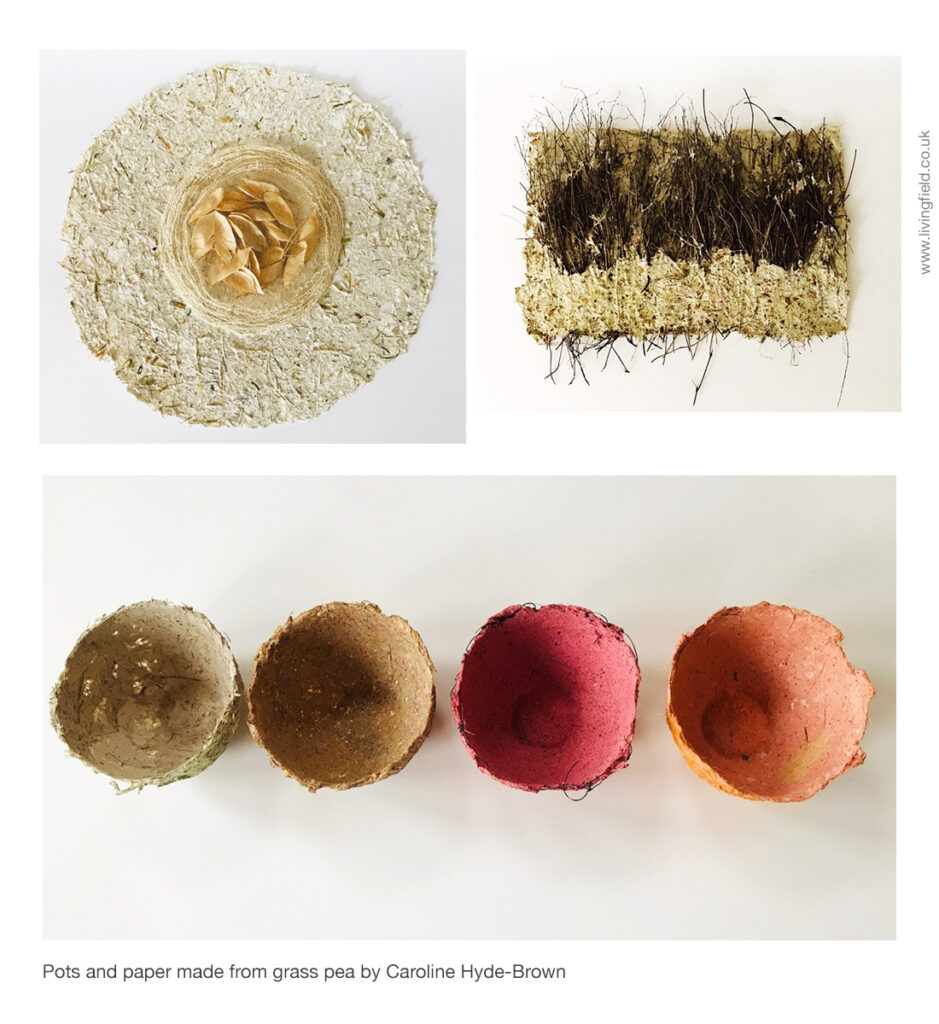
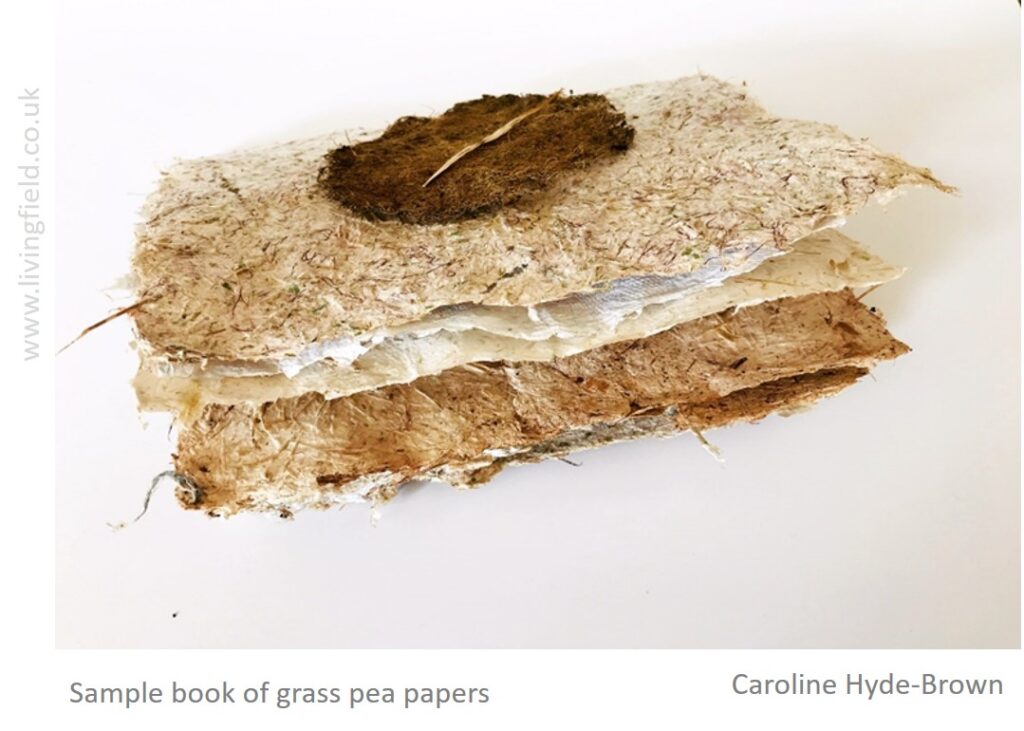
Caroline Hyde-Brown, at Norwich University of the Arts, gave the Living Field this account of her work with the legume, grass pea. Here are some examples of her craft.
Read on to see how it is done.
Introduction to the grass pea
The grass pea Lathyrus sativus is a member of the legume family (Fabaceae) and commonly grown for human consumption and livestock feed in Asia and East Africa (Caroline writes). It is a hardy yet under-utilised crop and able to withstand extreme environments from drought to flooding. The grass pea fixes nitrogen from the air which helps maintain a healthy and well fertilised topsoil [1].
However, the grass pea contains a potent neurotoxin called B-ODAP which increases if the plant is exposed to conditions of severe water stress. Historically the grass pea is known to produce adverse side effects with excessive human consumption which exacerbates the risk of a neurological disorder known as lathyrism which can cause permanent paralysis below the knees both in adults and children.
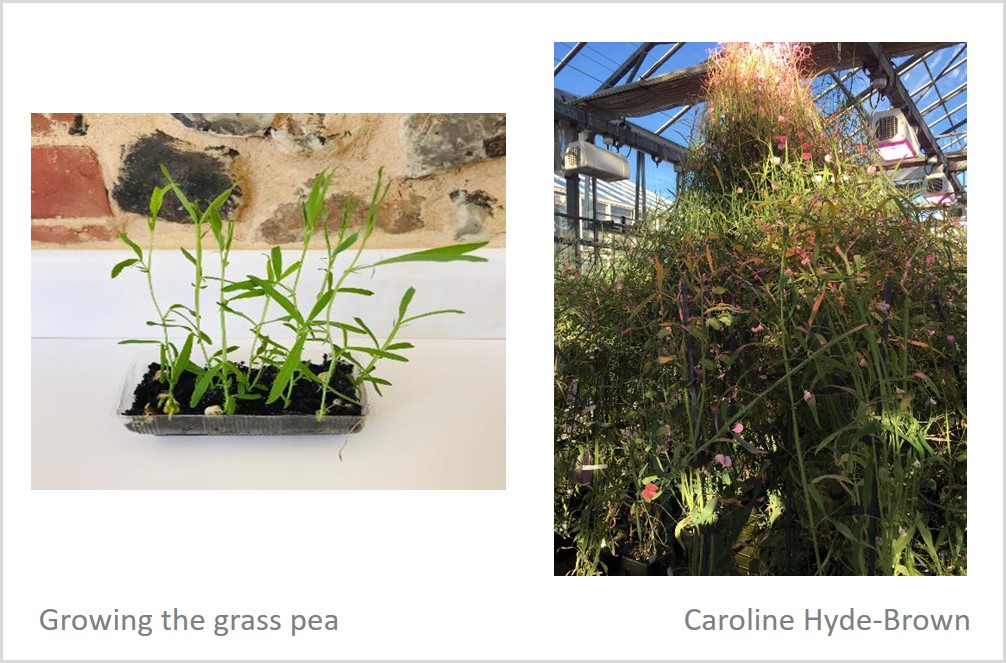
Growing the plants
In September 2019 I initiated a collaboration with John Innes Research Centre in Norwich to investigate whether this ancient legume could be utilised to create a biomaterial with a sustainability strategy of raising its residual value. With a mixed methodology of qualitative research, critical inquiry, and home-based experimentation, I explored the inherent qualities of the natural raw plant residue with Anne Edwards and Abhimanyu Sarkar [2]. I used a framework known as the ‘whole systems’ approach adding freshly collected rainwater and solar heat [3].
Growing the plants: (left) in shallow container, weak and spindly plants one month old, and (right) in a glasshouse at the John Innes Centre.
I experimented with different types of potting containers to observe growth patterns and plant behaviour. Shallow containers produced spindly and weak plants compared to the much stronger and higher yielding plants grown in deep ‘rose’ containers or in a glasshouse.
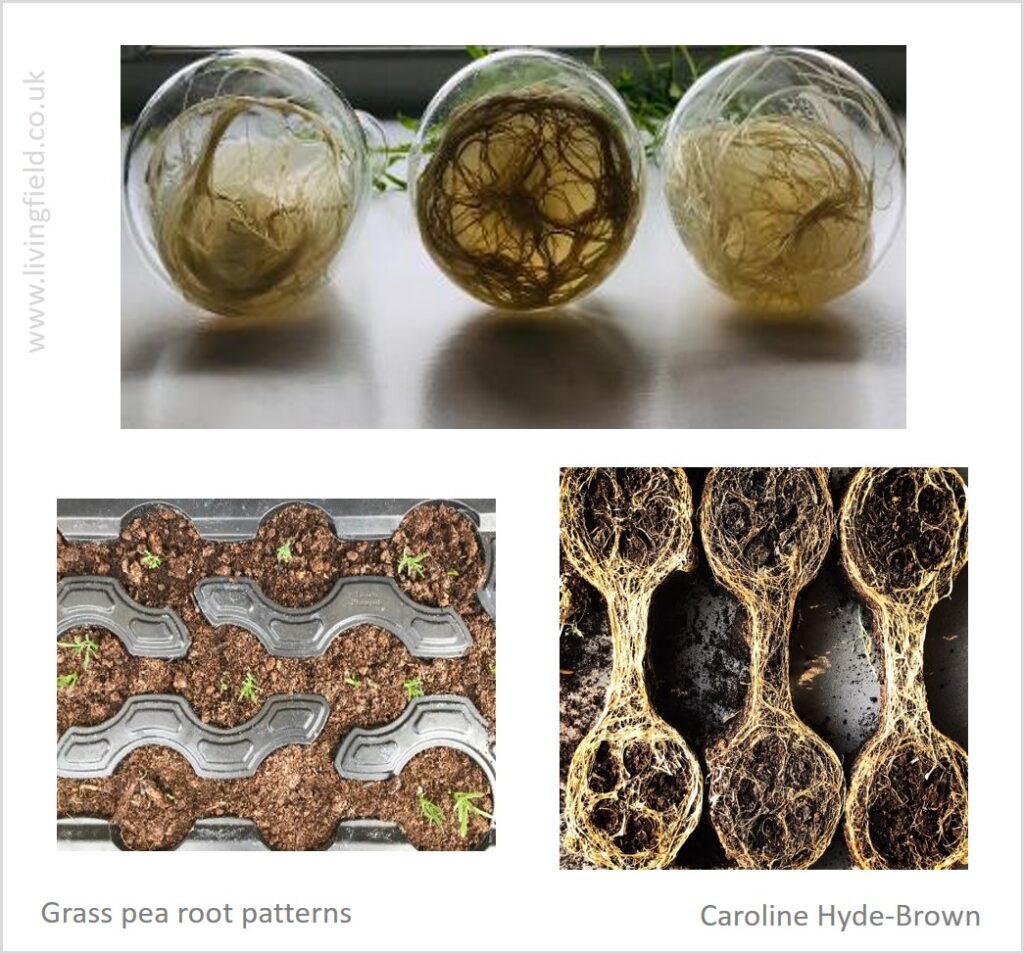
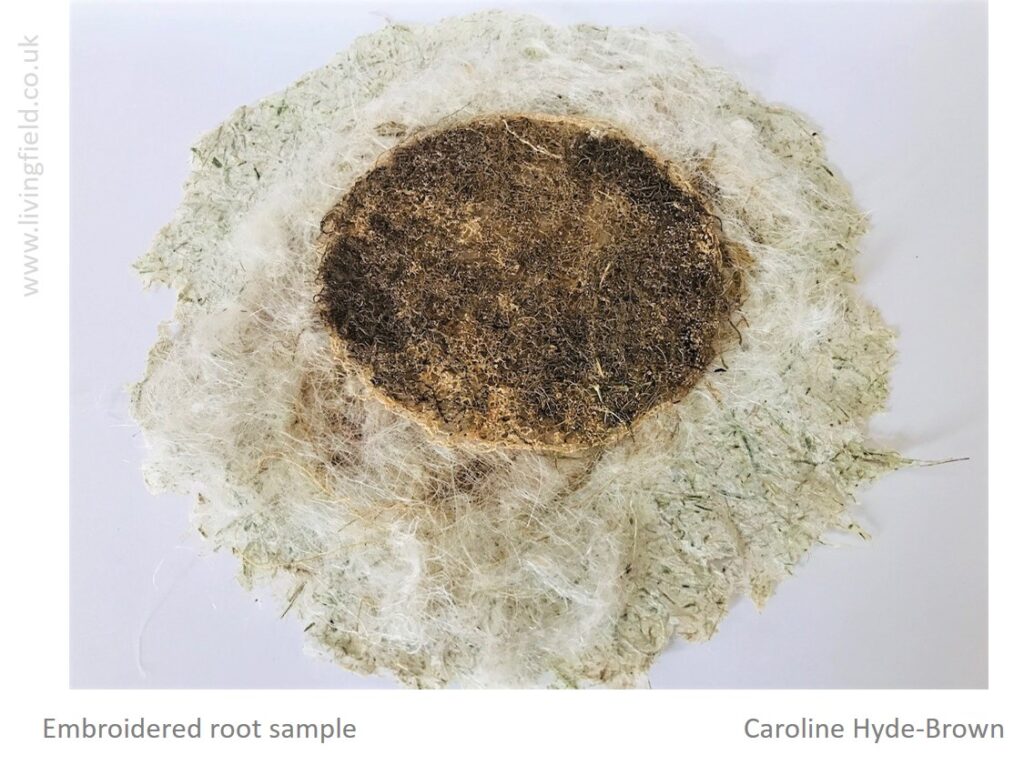
My assistance with the harvest at John Innes yielded positive results during January 2020. I began with behavioural growth studies in agar flasks, which provided a fascinating insight into the delicate root structure as the roots are normally below ground. Unexpected discoveries about how the grass pea behaved under certain conditions helped the iterative design process.
During lockdown last year I had time to observe the plants on my windowsill and how they used the agar provided by John Innes. I didn’t need to water them, and it was fascinating to see how the plant easily grew, the perfect house plant!
Root studies with grass pea: (upper) in agar flasks on a window sill, after 5 months; (lower left) seedlings emerging in a shaped shallow container; (lower right) soil turned out after six months to show root patterns.
I also planted some grass pea in different types of container with various depths to see which environment the crop preferred. The black container (photographs above, lower left) provided the wonderful patterned shapes shown lower right.
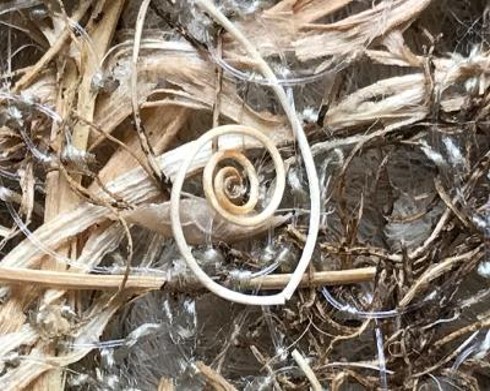
Embroidery with roots and tendrils
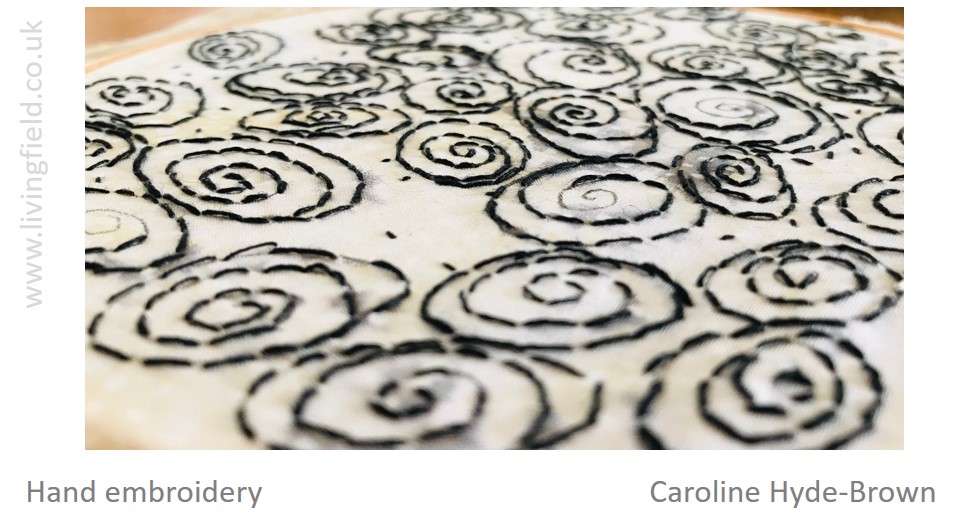
Perfectly formed tendrils from the harvested residue of grass pea inspired me to do some hand embroidery. I used Kantha stitching on cotton to reflect the Indian traditional embroidery technique of simple straight stitch.
Grass pea tendril
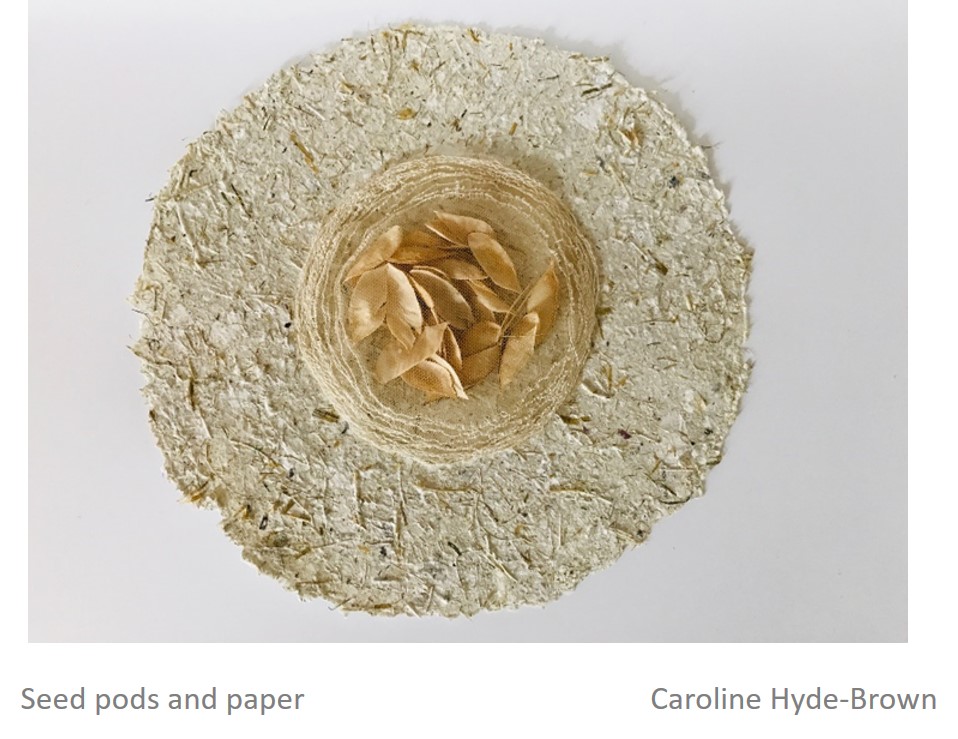
My overall aim was to see whether the grass pea residue could be recreated into a cloth of some kind. Cutting up the paper samplers and using other threads and vintage lace slowly transformed the paper into a fabric, but the harvested residue was extremely dry and brittle.
I was unable to spin a thread out of the stalks. However, I believe, with the right biotechnology, cellulose could be extracted from the grass pea to make clothing, paper, shoes and lighting. Recent advances prove that using agricultural waste is an extremely profitable and sustainable operation with companies such as Agraloop [4], already spinning innovative and unique fibres.
Papermaking
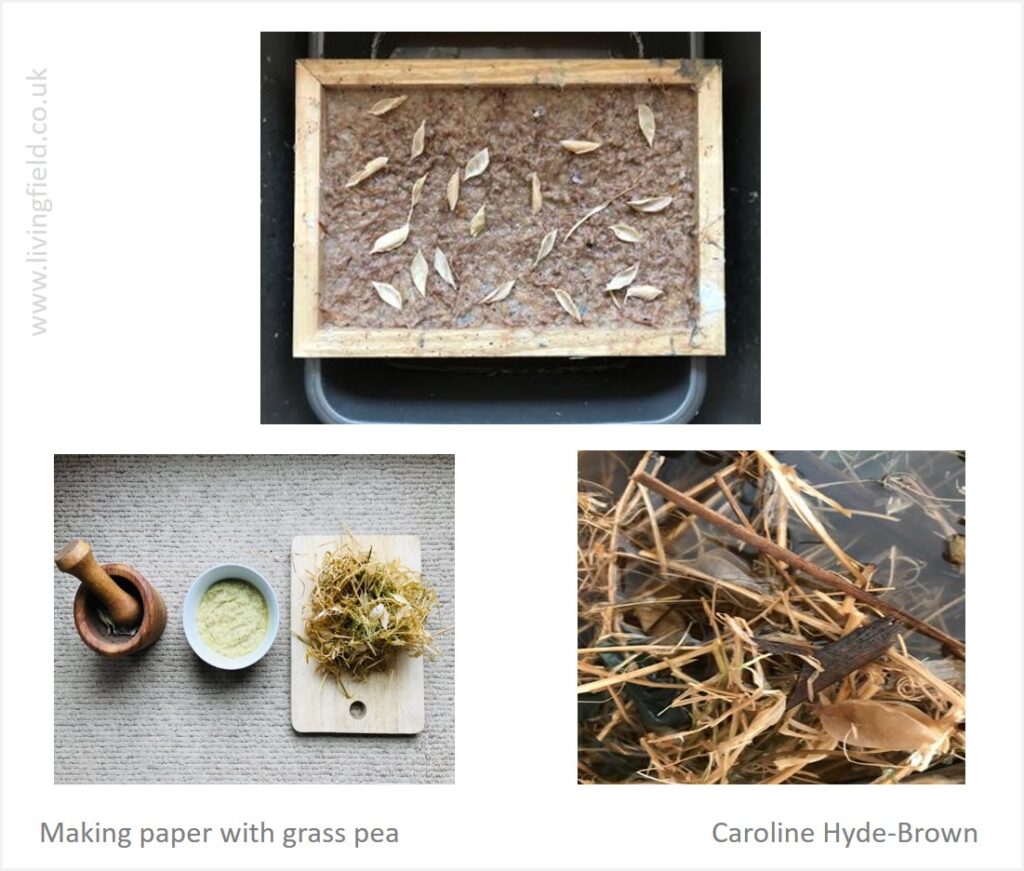
Initially my papermaking explorations were unsatisfactory. The handmade paper felt stiff, broke easily and resembled cardboard. After boiling the residue and retting it in a bucket for a week however, it softened to produce a softer slurry or pulp.
Making paper: paper slurry poured onto a mould and deckle with scattered seed pods adding texture and interest (upper); kitchen set-up with slurry, waste residue and mortar and pestle (lower left); and retting residue in harvested rainwater (lower right).
Although I was unable to provide precise samples of artisanal stationery, each piece of handmade paper had its own individual character. I began to realise that imperfections can help create an authentic narrative and felt more confident in exploring other possibilities with ingredients.
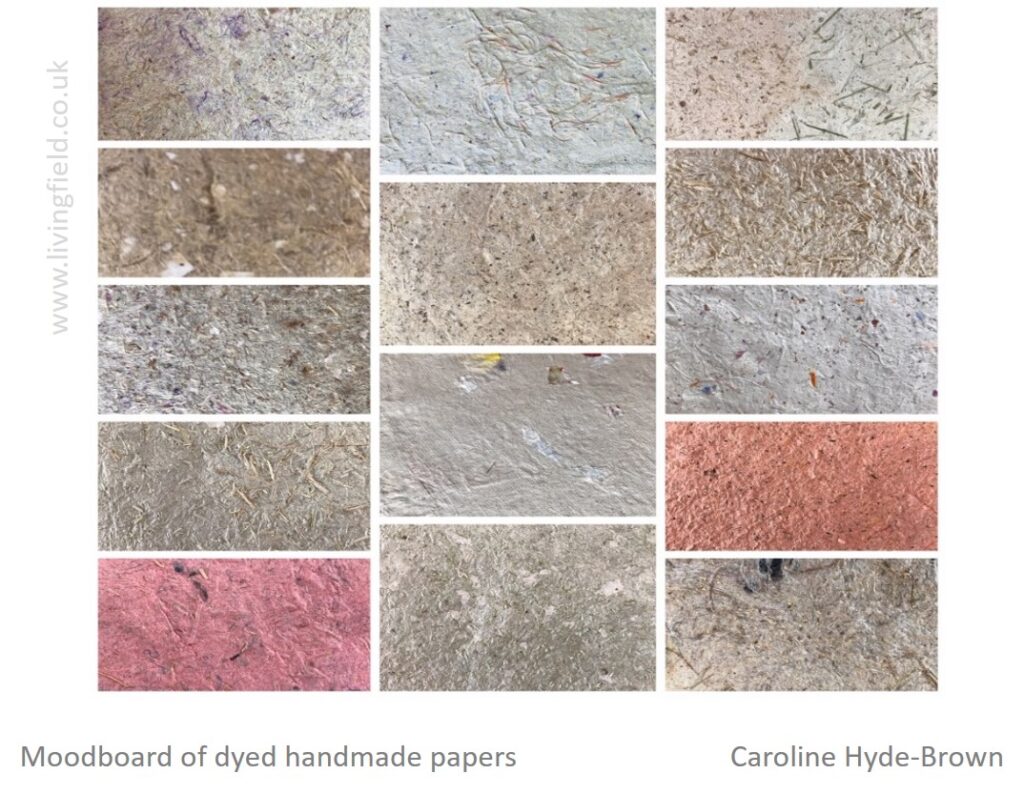
A series of handmade papers were constructed from localised resources. I wanted to see if the grass pea could hold other grasses and petals within multiple layers of slurry. I took advantage of the warm weather and dried them in the garden. By adding spices from the kitchen, combined with grass clippings and petals taken from hedgerows and heathers they took on a lovely range of colours.
Paper samples made with grass pea and root residue.
I also wanted to test some of the bio-resins from my collection of azeleas to see whether it added another material dimension. I looked at adding colour and referenced the pantone colour range for 2020 to provide inspiration for a moodboard of handmade paper.
Handmade papers coloured with various natural dyes
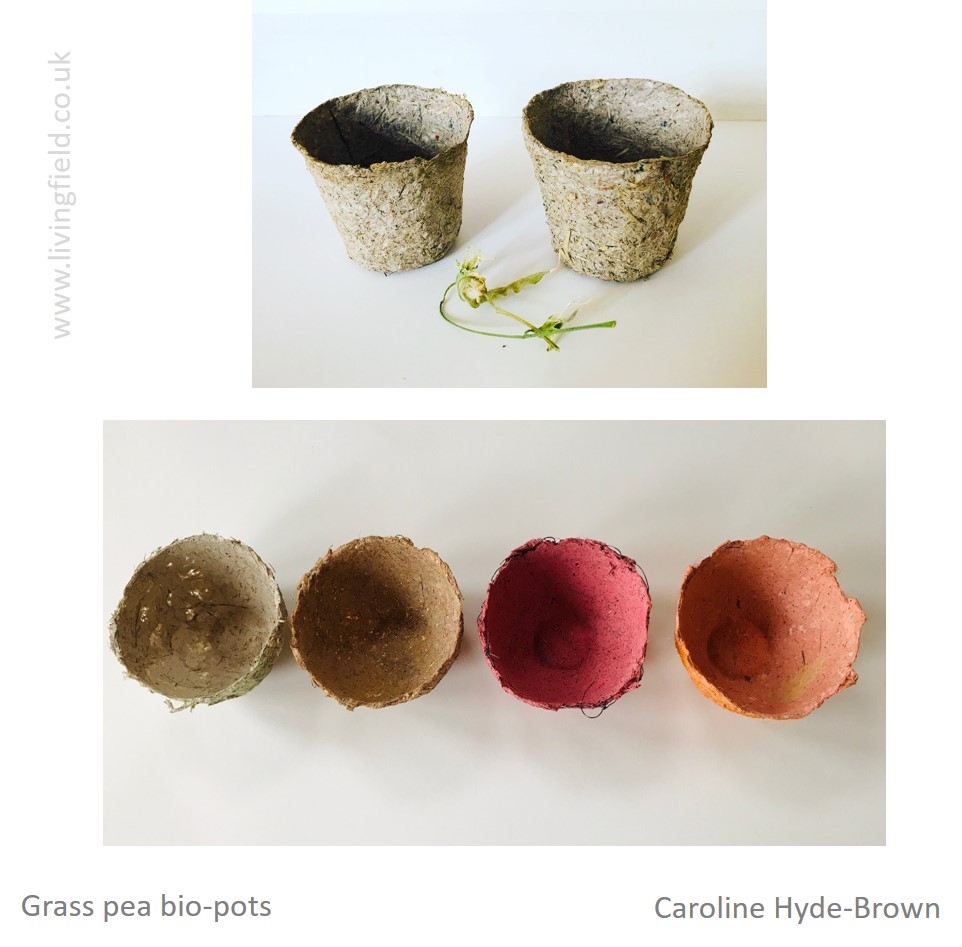
Bio pots and other functional products
Interpreting scientific knowledge and merging it with my own craft-oriented methods is a lengthy and complicated process. The bio pots initially started out as a conversation when I decided to see whether the knowledge I had gained through papermaking over the summer could result in something more tangible like a functional product.
I looked at whether the grass pea pots could be dyed to provide colour, starting with kitchen spices such as paprika and herbal tea bags with raspberry, blueberry, tea, and coffee. These were quite successful samples and ongoing observations are being made into the waterproofing and durability. Further growth studies will commence this year with a view to creating something that may offer a sustainable alternative for the tree planting initiatives overseas.
Grass pea bio-pot samples 2020 (upper) and kitchen decorative pots to keep nuts and spices in (lower).
… and some final remarks
Research into the use of natural resources to provide extra sources of income has proven potential. It shows how the bridging of traditional artisan work with modern design can provide sustainable solutions. An essential part of the process includes rigorous testing of raw materials to demonstrate that the process is both restorative and circular from the beginning of the supply chain to the end product.
As an inter-disciplinary artist, I seek to implement new ideas through forming partnerships which help shape and question my own practice. I feel fortunate that we could build a strong professional network to bridge knowledge gaps. It was a collaborative process that reinforced our objective of helping to improve rural livelihoods in India.
I conclude that the grass pea supply chain could be disrupted from field to biomaterial and repurposed to provide vital ingredients for economic change.
Sources | Links
[1] Caroline writes: “When all other crops fail, grass pea will often be the last one left standing. It is easy to cultivate and is tasty and high in nutritious protein, which makes it a popular crop. The Consultative Group on International Agriculture Research (CGIAR) states that at least 100,000 people in developing countries are believed to suffer from paralysis caused by the neurotoxin. More at the Crop Wild Relatives Project: The curious case of the grasspea.
[3] The “whole systems approach” was devised by a group of Product Design Students at the Iceland Academy of Arts in 2015 during a project using willow. They designed a unique range of products including paper, glue and string adding just heat and water.
[4] Agraloop: transforming low-value waste to high-value fibre.
[5] The Journal of Sustainability Education describes how collaborations beyond the comfort zone of specialist areas possibly hold the key to making unusual discoveries. Journal web site: http://www.journalofsustainabilityeducation.org/
The editor writes: Many thanks Caroline from the Living Field for sharing your experiences and experiments on grass pea. We hope you can continue to develop the technology and craft work and help to generate new income streams for growers.
Maize, along with rice and wheat, and to a lesser degree barley, provides most of the cereal or corn harvest for the world’s civilisations. Maize was domesticated in the Americas and did not arrive here until recent centuries, when ships and navigation were advanced enough to sail across an ocean.
Maize is a warm-climate crop [1] but consists of many varieties, some of which can be grown here in summer, where it’s product is known as corn-on-the-cob or sweet corn. It is also grown in stock farming as an animal feed, but mainly in the south of the UK.
Yet maize has many other uses. Here we look at two of them, both starting with the husk surrounding and protecting the cob – Jean Duncan’s exploration of paper-making using husks from maize grown in the Living Field garden, and the traditional use of maize husk as wrapping for Burmese cheroots.
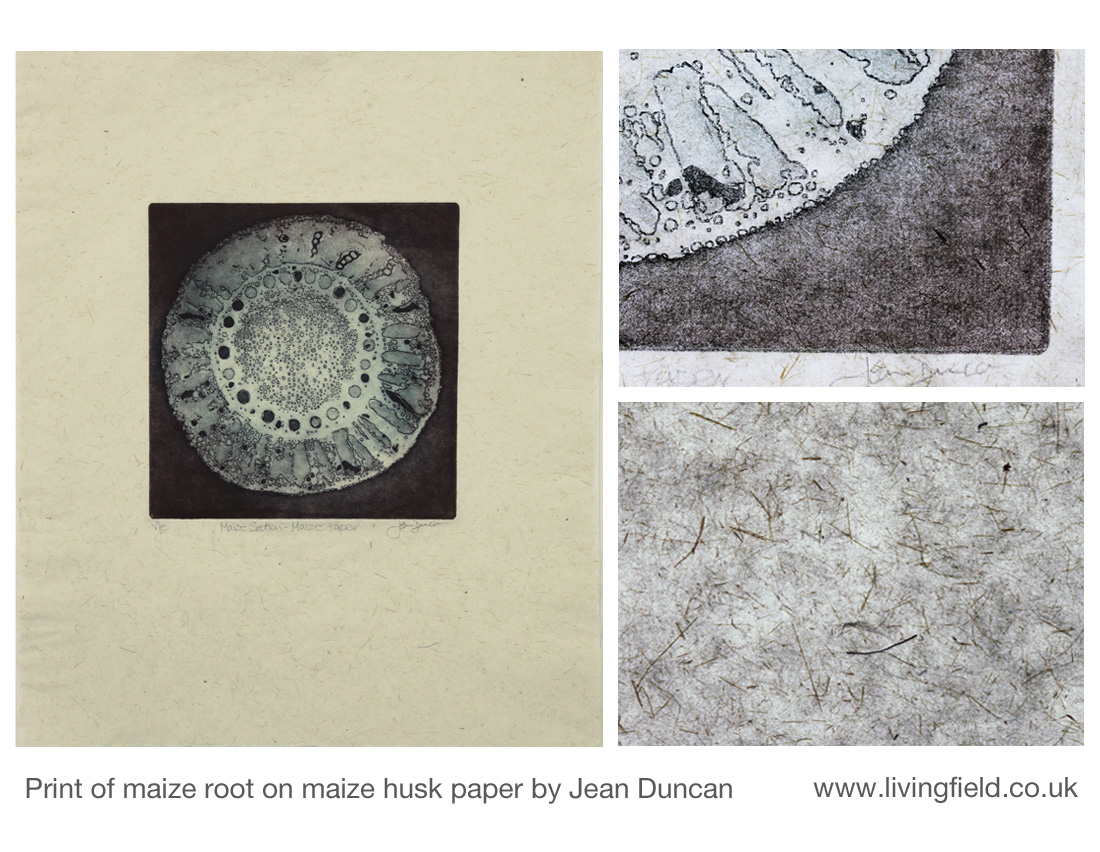
Print of maize root on maize husk paper
For making plant paper, Jean tried various parts of the maize plants including the leaves, the thick stems and also the papery coverings of the flowering and fruiting head, known as the husk, which she said made the best paper [2].
The images above are of a print on maize husk paper of an etching of a maize root cut in cross section and magnified so that the internal structure can be seen.
In the print on the left hand side of the images, the original root cross section is about 1 mm wide, the image itself is 22 by 22 cm and the paper 40 by 49 cm. To the right are close-ups of part of the print and of the paper, showing the visible fibres from the original husks, now converted into paper.
The paper in this case became a visible part of the finished art. Sources below give links to Jean’s description of making the paper and an exhibition in which images of roots were printed on various plant-based papers [2].
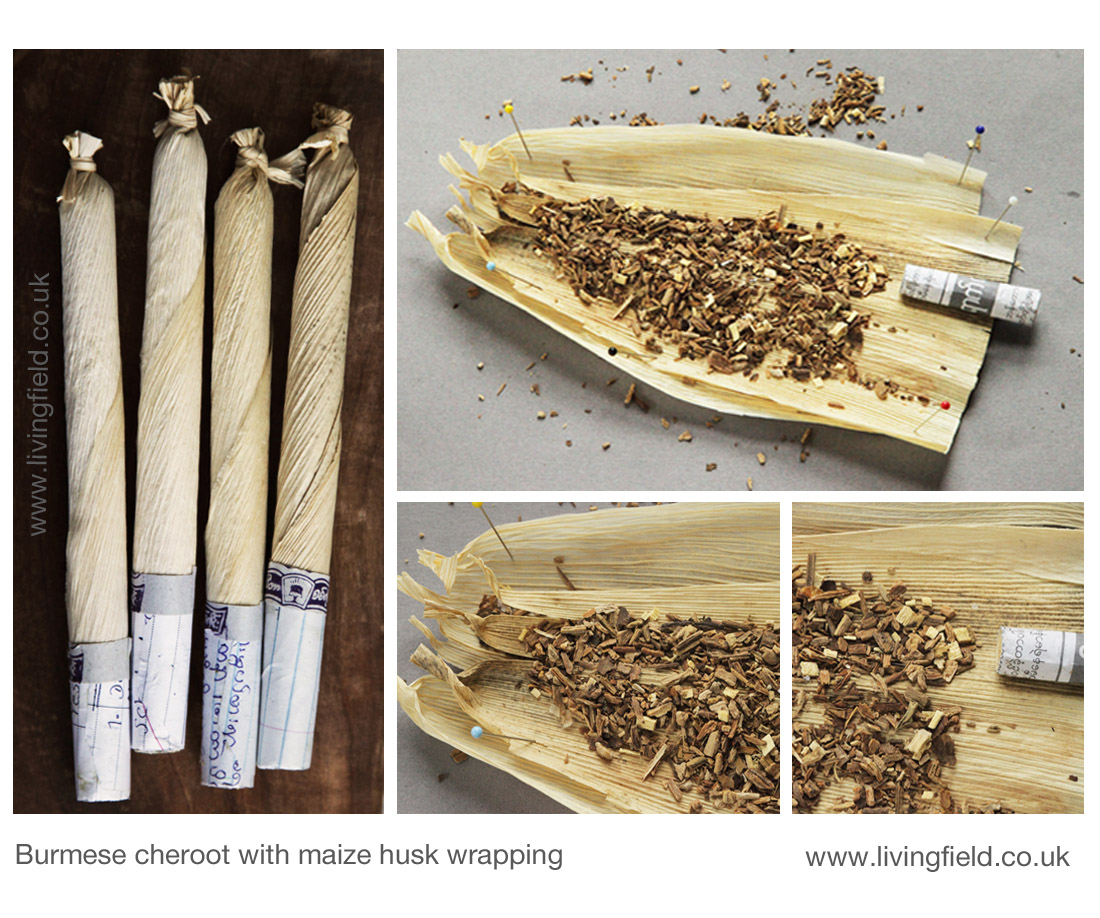
Burmese cheroot wrapping
Once it was brought across from the Americas, maize travelled quickly in the 1600 and 1700s and became a favoured cereal through Africa and among the warmer parts of Europe. It established also in Asia, but usually as a secondary crop behind rice.
Its parts were used not only for food for humans and animals. There is a history of usage as a medicinal, as a substate for alcohol (e.g. chibuku in Africa) and curiously, as a wrapping for cheroots.
The long cigar shaped structures smoked in Burma (now Myanmar) and known as cheroots are usually filled with a range of herby and woody plant material, not always including tobacco. The wrapping can come from a range of plants, but the cigars below were wrapped in maize cob husks [3].
Several husk-leaves were used to wrap each cheroot. The contents were, as said above, derived from a range of plant material, most pieces being 2-4 mm long. Each cheroot had a filter, consisting of tight rolls of leaf or husk. They were on sale locally along the Irrawaddy River in Burma, now Myanmar [4].
In his compendium of useful plants, Burkhill [3] notes that an industry arose in north Burma at some time in the last few hundred years, based on the use of a type of maize, characterised by a waxy endosperm (the store in the seed), which also had a ‘peculiar suitability of the sheath for cheroots.’ He also refers to the possibility that certain impoverished areas were afflicted by the vitamin deficiency pellagra through reliance on maize, as in parts of the USA [5].
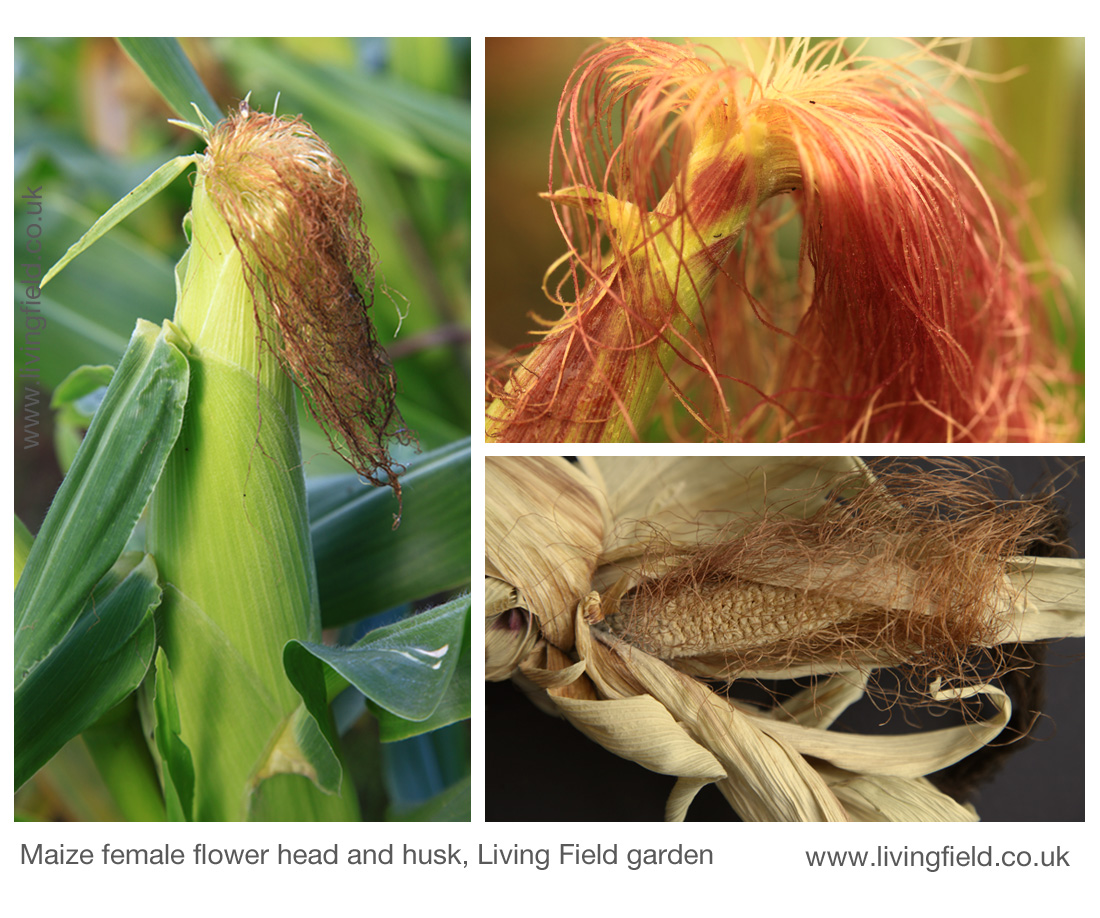
Male and female flower heads
Maize is unusual among the cereal or corn plants in having separate male and female flower heads, each on compact ‘branches’ held on different parts of the same plant. The male flowers are usually held at the top of the plant and the female lower down. Female branches are shown in the images below, taken in the Living Field garden.
The female flowering head remains mostly hidden within a sheath of leafy material (above left) that later forms the husk. The grain sites are arranged around the central ‘stem’ hidden by the sheath. The stem and grains together will later form what we know as the corn cob.
Each grain site puts out a long thread, many of which together emerge from the sheath in an irregular bunch, often named a silk, the female part of the reproductive process in this species (seen reddish, above left and top right).
The function of each female thread (comprising a stigma and style) is to receive pollen from male flowers and to provide a channel for the pollen tube, that emerges from a pollen grain, to grow into the sheath to a grain site. When pollinated, the grain sites fill to give the familiar, yellow kernel which remains protected by the sheath.
Sometimes the season in the Garden is too short for late flowering maize heads and they do not grow into a finished, filled cob. One of these late heads was prized apart to show an undeveloped cob (lower right in the images above) and the surrounding sheath that had turned to parchment in feel and colour. The female threads, now fibrous and dead, can just about be seen issuing from each grain site.
The paper shown in the images at the top of the page was made from husks like these.
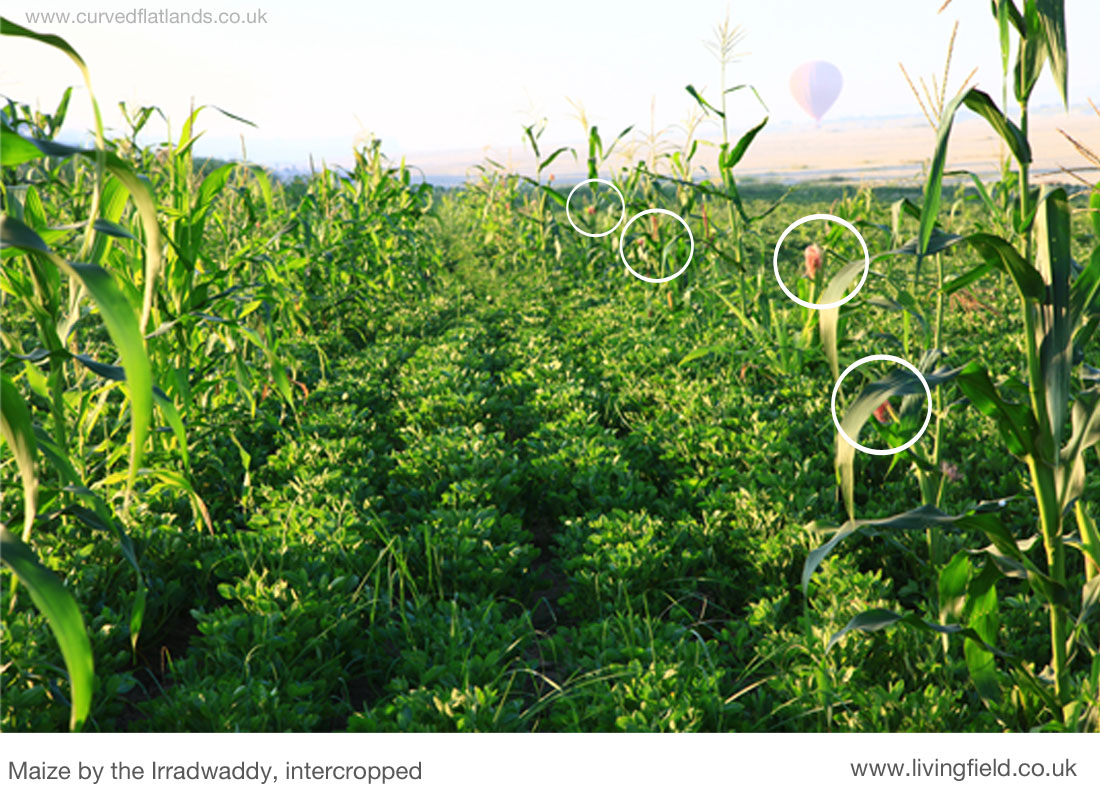
Finally, here is an image of maize intercropped with groundnut growing by the Irrawaddy river [4]. The male branches can be seen at the top of some of the plants. Female flowering heads are circled.
Sources, references, links
[1] The botanical name for maize is Zea mays. The genus Zea is of the grass family and has only this species. It was domesticated and developed many thousands of years ago in Central and South America. It was first brought across the Atlantic Ocean in the late 1400s, then spread rapidly east.
[2] The article Maize paper by Jean Duncan describes how to make paper from plants in the garden. The exhibition The Beauty of Roots shows prints and etchings made on maize and other plant papers displayed at the University of Dundee in 2017.
[3] Details of the spread and growing of maize in Asia are given in the major compendium of useful south-east Asian plants by Burkill, published in 1966, but clearly the result of many decades of investigation and cataloguing. He lists the use of maize husks for cheroot wrappings and of maize leaf and stem for paper.
Burkill IH. 1966. Dictionary of the Economic Products of the Malay Peninsular. Two volumes, 2444 pages. Published on behalf of the Governments of Malaysia and Singapore by the Ministry of Agriculture and Co-operatives, Kuala Lumpur, Malaysia. The entry on maize is in Vol II at pages 2327-2334.
The writer refers to the following article for confirmation of the use of ‘waxy’ maize varieties as cheroot wrapping in Burma: Collins GN.1920. Waxy maize from upper Burma. Science 52, 48-51. doi 10.1126/science.52.1333.48.
[4] The cheroots shown in the images were bought at a village store in 2014 on the banks of the Irrawaddy. Further description of the region is given at Mixed cropping in Burma on the curvedflatlands web site in an article by G R Squire. Disclaimer – no cheroots were smoked in the research for this article!
Most of our paper comes from plants, but the process by which leaves and stems are converted to sheets that we can write on or wrap things in is unknown to most of us.
As part of her work with the Living Field, Jean Duncan has been making paper from plants grown in the garden.
She started with some maize, which is a tropical and sub-tropical species originally from the Americas. Some types can now grow in our climate, and it was one of these that was grown in the garden for its cobs (corn on the cob).
Jean used the maize plants to make the paper. Here is a description of what she did.
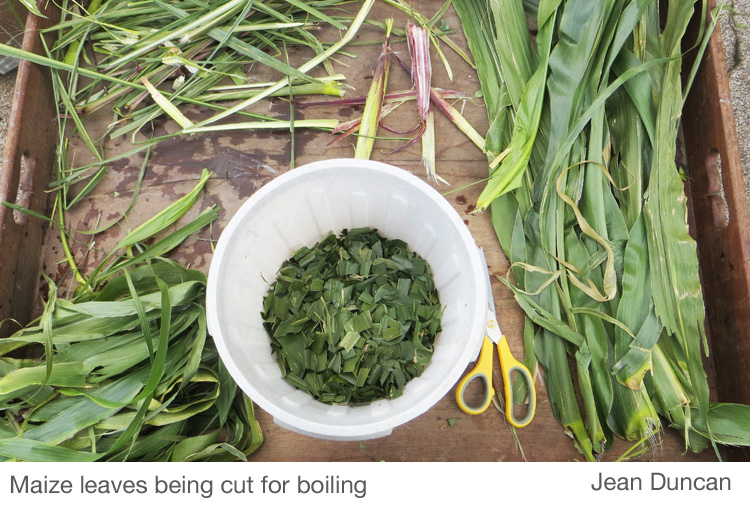
Step 1 is to collect maize leaves and stems when they are in good condition, still green.
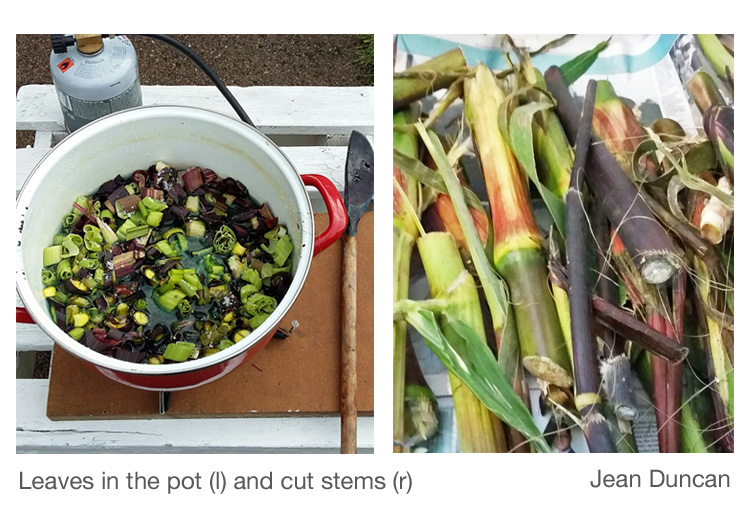
Step 2 is to cut the leaves and stems into small pieces. Leaf pieces should be about the size of those in the white bowl. The tough stems were cut into larger pieces (right below).
Step 3 – put the cut material into an enamel bowl or pot (above left). Add soda ash to the material, 1 teaspoon for a 10 litre pot, and mix.
Step 4 – cook the plants for 3 hours, or more if the material is tough. At this point you will need pH indicator strips (litmus paper) to check that the cooking is going according to plan. (Litmus can be bought on-line or at some gardening shops.) The pH of the mixture should be around 8, but if it drops to 7 or 6 then add a little more soda ash. When cooked, the fibre should be soft and easy to tear.
Step 5 – rinse the fibre thoroughly in water; when fully rinsed the pH or the water should be neutral (i.e. about 7).
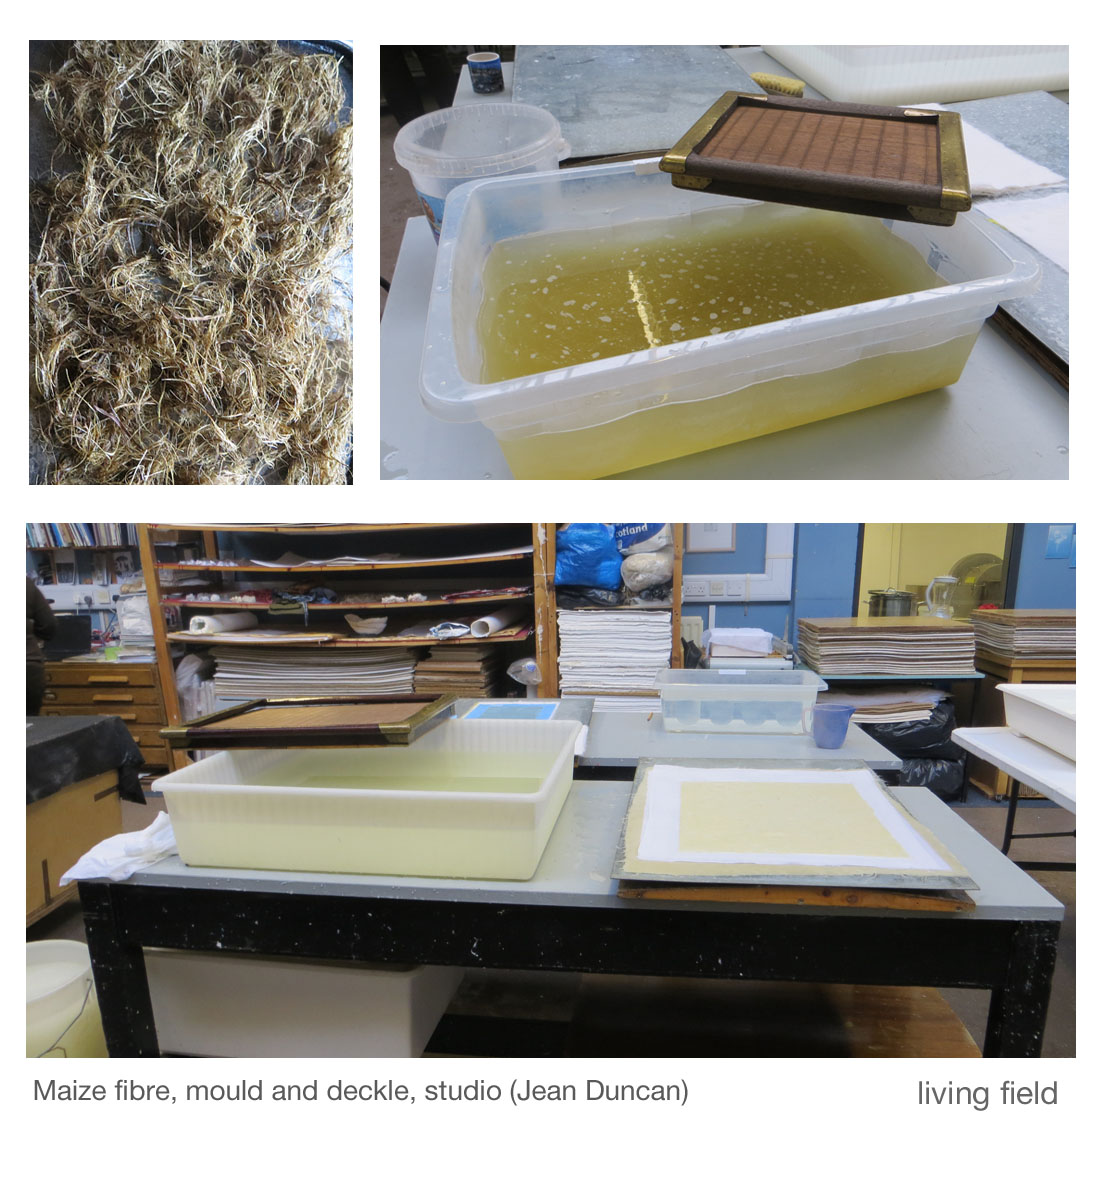
Step 6 – the fibre now needs to be beaten to a pulp. The traditional way is to beat it with a mallet for a few hours. (Craft-workers in some countries still use this method). An alternative, if you have electricity, is a kitchen blender working in short bursts so as not to burn out the motor. Jean uses a machine called a Hollander beater.
Step 7 – the fibres are now ready to be transformed into sheets of paper. The pulp is suspended in water. A ‘mould and deckle’ is lowered into the water (image above) and brought out slowly with a flat layer of fibre on it, or else the pulp is poured into the mould and deckle until there is a flat layer of the right thickness for the type of pulp (which you work out by trial and error); the water drains out through holes leaving the moist fibre.
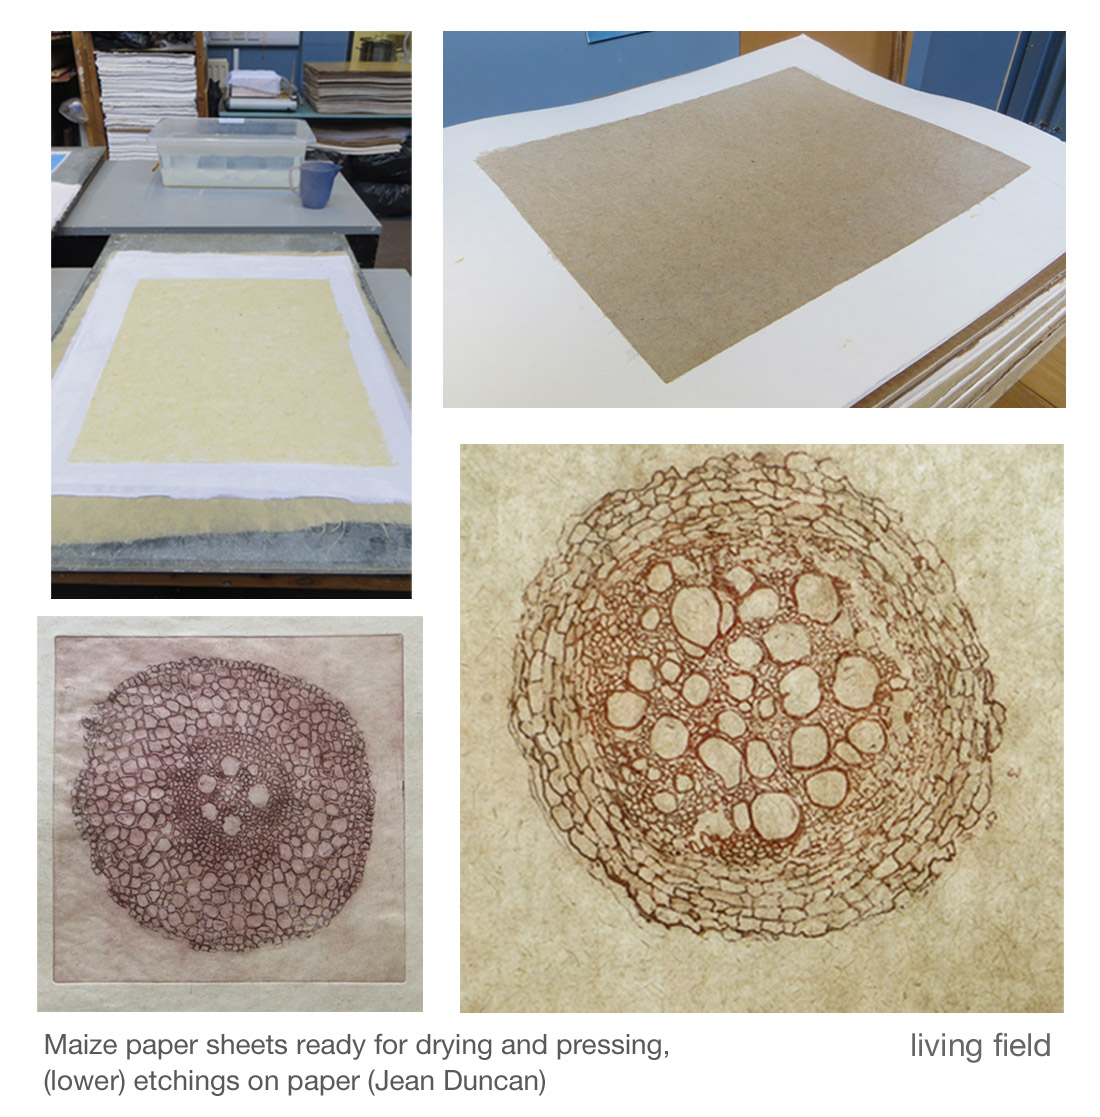
Step 8 – the moist sheet of fibre is turned onto an absorbent fabric or board or something similar for drying and pressing, a procedure that takes about 3 days (top right in images below).
Maize paper: lighter sheet (top left) is from the husk round the cobs, the darker sheet from stems; etchings below of root cross sections (Jean Duncan)
Another of the garden’s unusual plants attracting attention – NileHQ, a design company, commissioned a photographer from Dundee to take some images woad growing in the Living Field garden.
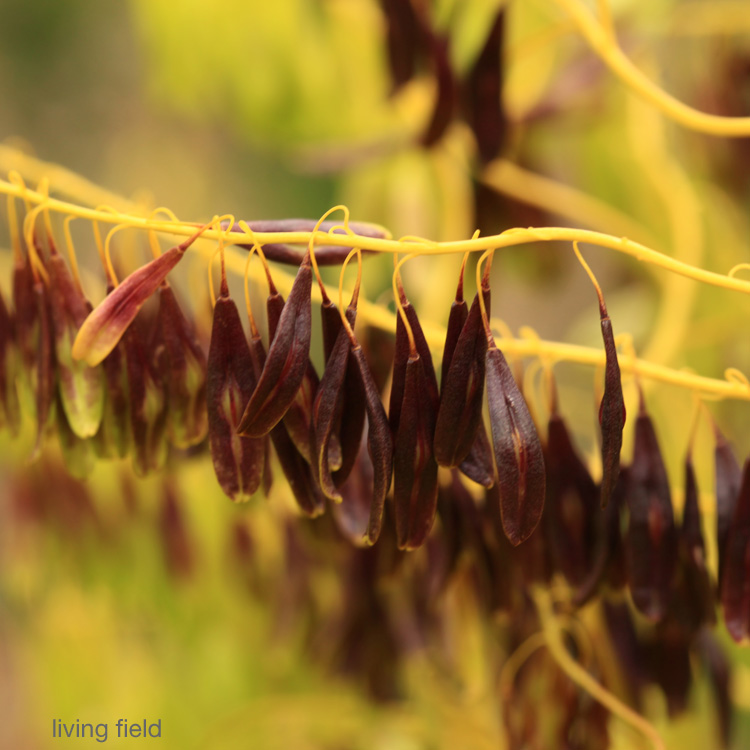
Woad flowers early in its second year. By late June, the yellow flowers are almost gone, while the pods, hanging in masses on the pale yellow floral branches, are turning from green to brown. In the next few weeks they will turn black and then the seeds are mature.
Woad reproduces in the garden from its own dropped seed. We thin and sometimes rearrange the plants in the summer of the first year.
Photograph above by the Living Field on 29 June 2015.
Indigenous crops; Scotch Bonnet; wool, woad and indigo; Tam o’Shanter, Burns supper; staple food of the north Atlantic seaboard; tatties, neeps, oat and barley; the grey cat!
In its undying search for the truly indigenous crop, the Living Field investigated the ‘Scotch Bonnet’, to find it was nothing local at all, but a hot little capsicum, now grown in the West Indies and other tropical places and used to give some spicy heat to food.
Why then is it called the Scotch Bonnet? It seems because it looks like one. Unlike many varieties of the chillies, this one bulges and sometimes flops when it leaves the stem: to some, with imagination, it resembles a Scotch Bonnet, on a head.
The Scotch Bonnet
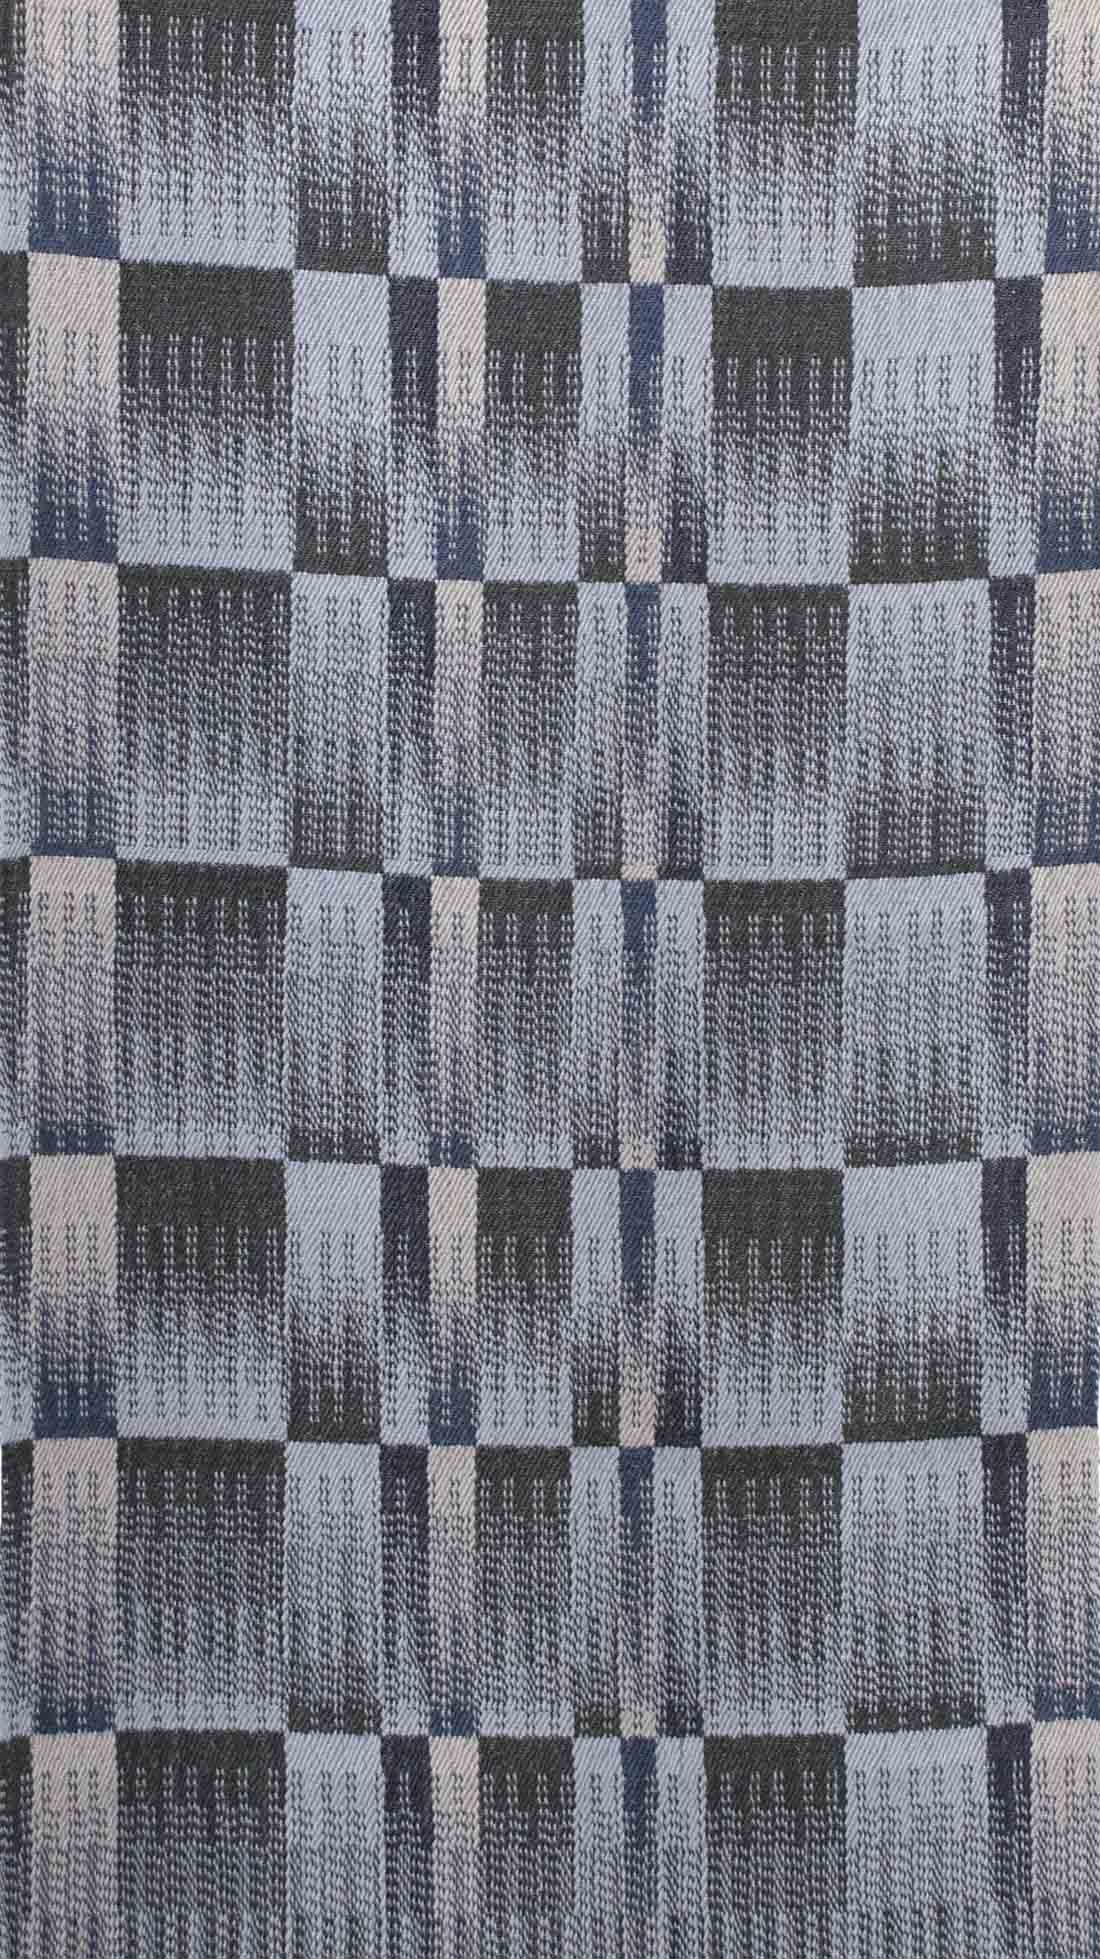
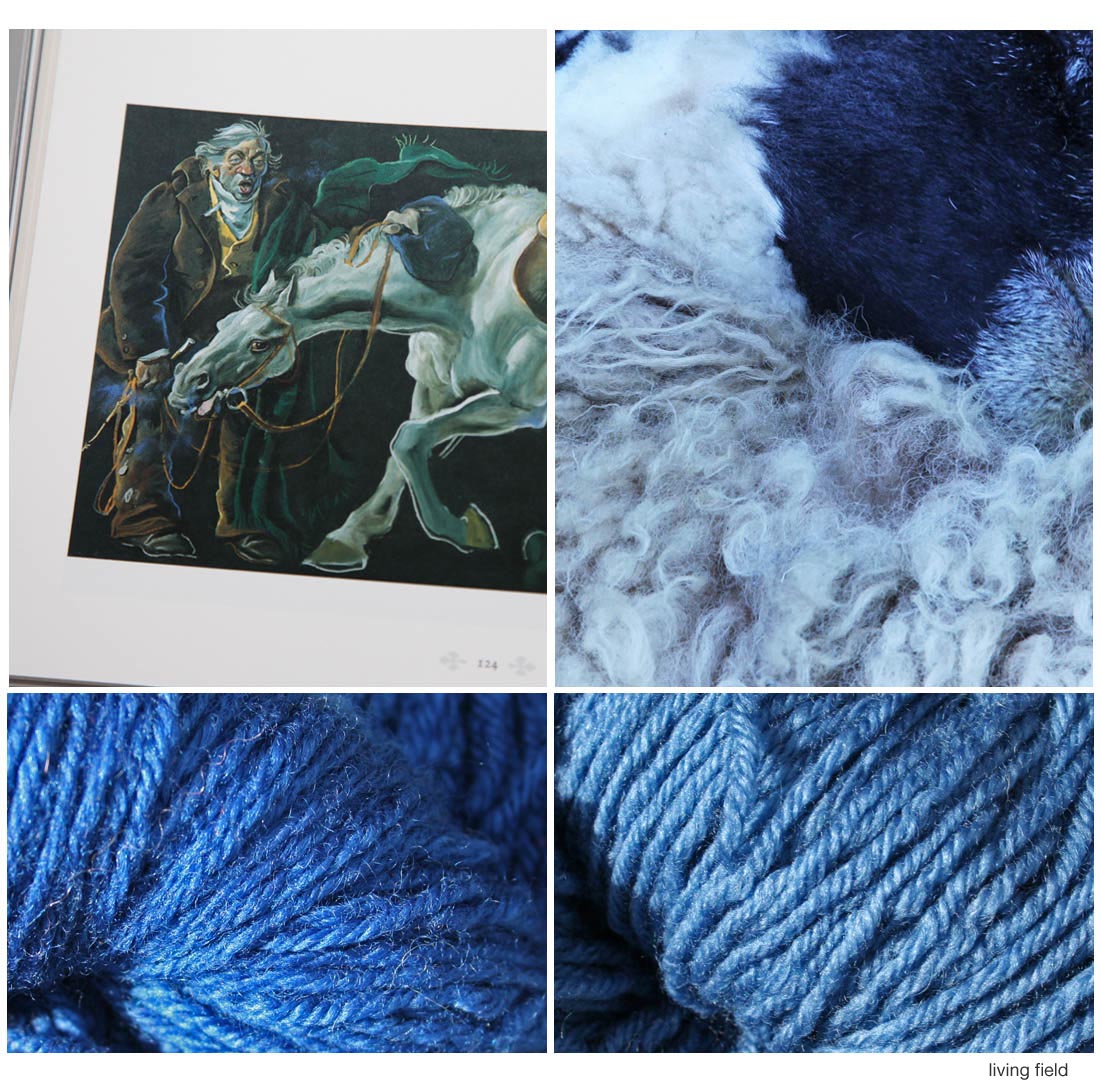
Now the Living Field is well disposed to the headgear named Scotch Bonnet, originally made of local fibre, usually wool, and dyed blue with woad Isatis tinctoria, which was once grown as a crop in these islands, or with the deeper indigo Indigofera tinctoria, which is imported and replaced woad. Such skill and craft go into making this one little hat: you have to rear the sheep and shear them, then wash, spin and weave the fibre, grow and harvest the woad or indigo, extract the dyestuff, dye the cloth, then form it into a shape that would fit on a head – and it was all done before electricity.
But we see the Scotch Bonnet (headgear) is also called the Tam o’Shanter, and this is, it seems, because Tam in the poem by Burns wears a blue bonnet – it’s mentioned only once, but there it is – ‘Tam’s blue bonnet’.
Sheep being sheared of its wool (top right), wool dyed with woad (bottom right) and indigo, and photograph of scene from Gourdie’s Tam O’Shanter showing Tam’s blue bonnet in hand (Living Field / details of book below)
Tam o’Shanter
Now these three words do not define what sort of bonnet it is, yet those who have depicted the bonnet in drawings and paintings of the epic give it the character and shape of a Scotch Bonnet, and those such as Alexander Goudie (1933-2004) who have painted in colour give it the colour blue – woad-blue or indigo-blue.
In Goudie’s fabulous paintings, the blue bonnet is there in almost every picture. It grows in significance. Even when chased by Cutty Sark and the other infernals, the blue bonnet stays on. Even when, with diminishing sark, she grabs Maggie’s (Tam’s mare’s) tail, pulls it and leaves just a stump of hair … the bonnet stays on. Considering the state of Tam, and the number and aggression of the infernals .. you wonder how the man and mare escaped? Was there something in these blue-bearing plants that somehow made Tam and his mare go faster or the infernals slower. Doesn’t matter, because if they had caught him, there would be no recitations of the poem and much less fun at Burns Night.
Burns Night
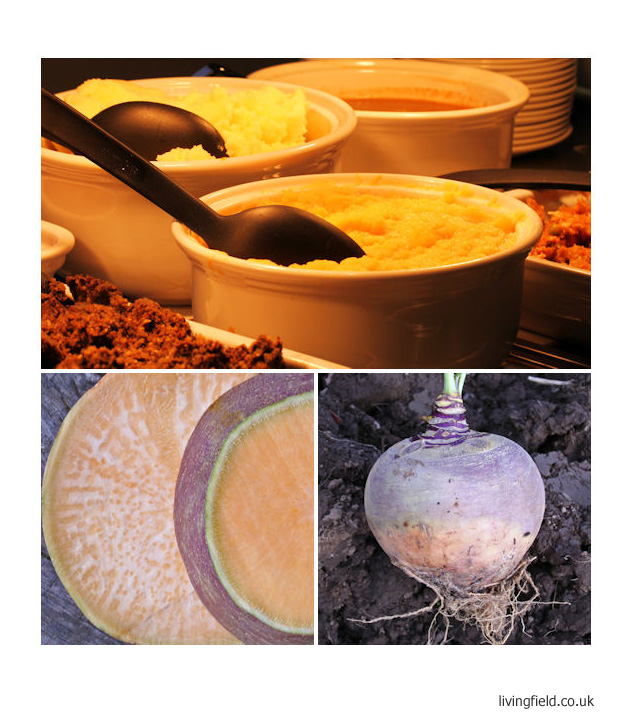
The poem Tam o’Shanter is very much associated with the festivities of the Burns Supper, and through the medium of the Supper, visitors can sample some of the great staple food and drink of the north Atlantic seaboard – oat, swede, potato and barley. Together, and with offal, including lungs, and other fleshly stuff from sheep, they make the traditional meal of haggis, neeps and tatties, the barley going not so much into the haggis as into the dram for those who partake (though, on the Night, the dram can sometimes … well … go into the haggis).
Haggis, neeps and tatties (top), whole swede and sliced swede (Living Field)
Would Burns have known the main crops that now form his Supper – he was a farmer for a few years? Sheep of course he would have known. Of the three main vegetable constituents, only oat has been here for a long time and that for thousands of years. He would have known oat. The neeps, usually swede rather than the (white) turnip, and tatties (potato) are relative newcomers, arriving perhaps a few decades before Burns was born. Burns probably knew about swede and potato but might not have grown them. Barley is older than oat here and he would have known barley and certainly known its products.
So while Burns (1759-1796) is now celebrated around the world, the world reciprocated before he was born by offering the vegetable constituents of his commemorative supper – oat and barley from west Asia, swede from (probably, though it’s not certain) east Europe or west Asia and potato from Central America. What a generous world!
Sources at the bottom of the page give links to his poems and song and to the Scots Dictionary. The image of haggis, neeps and tatties (above) was taken at a Burns ‘lunch’ at the Hutton staff restaurant. For those who want to know more about the crops, below is something more on swede, potato, oat and barley.
The crops
Tatties
The tatties’ tale is well told elsewhere. Briefly, potato Solanum tuberosum arrived in Britain from the other side of the Atlantic in the late 1500s, but gained little interest other than a garden curiosity until …..
“To Thomas Prentice, a common day-labourer, who lived near Kilsyth, is the honour due of bringing this useful esculent into general notice in Scotland [so wrote Lawson and Son in 1836 only 40 years after Burns’ death … and read on … ] He procured, in 1728, some “sets” from Lancashire, and bestowed considerable care in their propagation; and as their value became known, they were eagerly sought after by his immediate neighbours. By continuing the cultivation he, in a few years, saved upwards of £200, with which he purchased a small annuity, on which he lived independently to an old age, dying at Edinburgh in the year 1792.”
So Thomas got his tattie tubers from Lancashire well before Burns was born and he died only a few years before Burns did. Burns was probably familiar with the potato, but only just. His parents’ generation probably did not know it and his grandparents’ would not have known it. Yet what an explosion of genetic resources there was after that, because little over a hundred years later there were 175 recognised types of potato known to Lawson and Son (1836, 1850) and today there are great collections of genetic resources such as the one at the Hutton Institute.
Neeps
In their list of 1852, Lawson and Son, seedsmen from Edinburgh, write “in modern times the turnip seems to have been re-introduced to this country from Flanders about two-hundred years ago” which is the 1650s or thereabouts, but they also state that the time of introduction and the degree of cultivation of the swede or Swedish turnip is less certain though probably later (let’s approximate to around 1700). By Burns’ time the turnip had become a commercial farm crop in some areas of Scotland. Today the turnip has the botanical name Brassica rapa and the swede Brassica napus.
Both types of turnip were used to feed horses and cattle, but also people. The swede, the same species as oilseed rape, has leaf that is less coarse and hairy than the turnip, bluey-green rather than bright green and generally a yellow-orange flesh rather than white, which colour remains when cooked and mashed. So the neeps that are eaten these days with haggis and tatties are mostly swedes. An excellent vegetable, rich, smooth and distinctive to the taste, one of the very finest of the cabbages.
The corn
Oat Avena sativa and barley Hordeum vulgare had been the staple cereals of the north atlantic seaboard for a very long time. Charred grain of barley has been found in the earliest farming settlements. Their relative popularity has risen and fallen but in Burns’ time, oat was by far the most common, and it is the meal ground from oat grains that binds the animal constituents of the haggis. Today it’s the other way round, barley is the commoner crop, though oat is the one still used in haggis. More on oat and barley can be found on this site at Garden/Cereals and in the series of articles on landraces, e.g. The bere line – rhymes with hairline.
The grey cat?
She says “Arrived, invited, for a SoSCOtchBOnnet photoshoot posing in nothing but a Scotch Bonnet – and what a bonnet! Fine wool, indigo-dyed, cost me the earth … credit card maxed out … but the editor says ‘no nudity on the Living Field web site’ and I had to keep my fur on … no fun in that. Name’s Meggie by the way, like Tam’s horse Maggie but with an ‘e’. I do photoshoots. Call me.”
The grey cat, enigmatic, with natural dye strips (from top) hazel catkins, indigo, dock, rhubarb and (vertical) madder (Living Field)
Sources
Burns poetry. Best get a book of it – there are several – and read it by a fireside on a winter’s night or in a field of corn and poppies in midsummer.
Tam o’Shanter, a tale by Robert Burns, illustrated by Alexander Goudie. 2011. Berlinn, Edinburgh. More on the artist at http://www.alexandergoudie.org.uk at which – check under ‘paintings’ and ‘Tam o’Shanter’.
A Scot’s dictionary is handy if you are not familiar, e.g. The Concise Scots Dictionary (The Scots language in one volume from the first records to the present day). Editor in Chief: Mairi Robinson, 1985. Aberdeen University Press.