If you are in Cahors, Occitane this month, you should not miss this exhibition Nature Under Screen – Nature au crible – by Pascal Levaillant and Roselyne Corblyn, hosted by Cahors Juin Jardins [1] and held 1 to 31 March [2].
If not, then here are some of their works – see more via the links below.
Pascal and Roselyne are artists-botanists who form the Leveillant-Corblin collective [3].
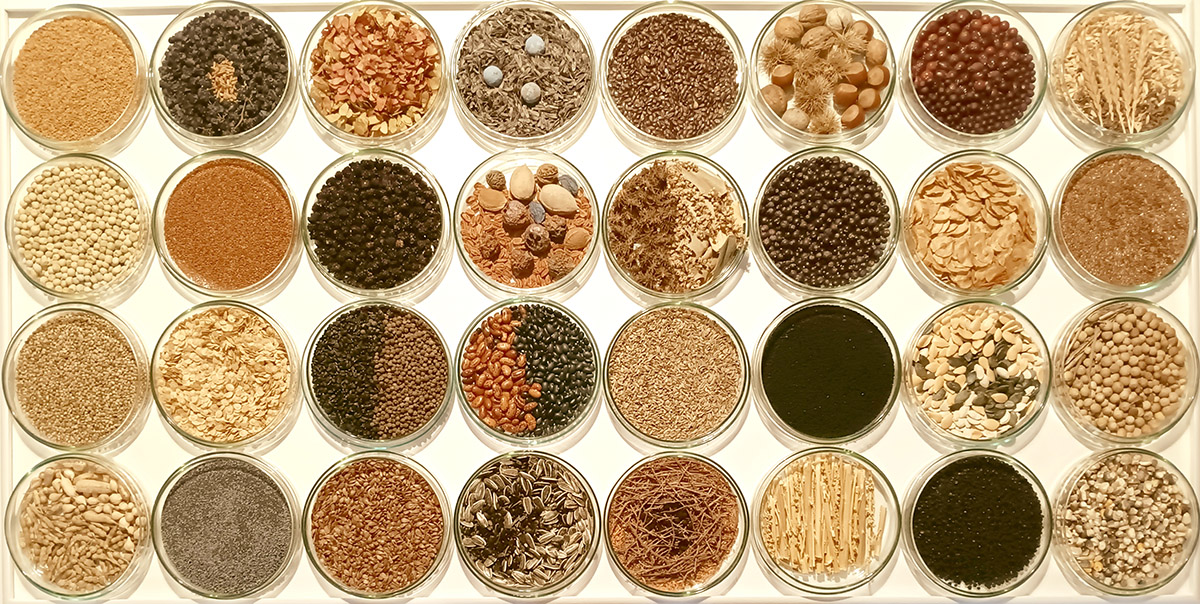
Seminotheque graines du Quercy, 2024 Cahors
From the press release … “Cahors Juin Jardins welcomes the Norman duo Corblin-Levaillant (aka Roselyne Corblin and Pascal Levaillant) for an installation of contemporary herbaria which announce Spring already! Based on the annual theme of June Gardens Humus Miraculum, the duo of artists deploys all their botanical knowledge starting from humus, a miracle substance, down to the seed, exploring biodiversity in France for over a decade.”
“Both botanical artists stopover in Cahors, nourishing their exhibition with literary references and botanical (Gaspard Koenig; Marc-André Selosse, Patricia Touyre, Anne Cauquelin…) and offering several artistic and botanical pieces with poetic names (Botanical surveys, Compost escapes, Seminotheque outings…) to pay homage to the miracle of humus. To be discovered in the hall and the garden of the Chai.”
[2] Press Release: JUNE GARDENS EXHIBITION | NATURE UNDER SCREEN Shades of humus and botanical leavening. Corblin-Levaillant collective, visual artists-botanists, LE CHAI (youth hostel – 52, avenue André-Breton in Cahors) From March 1 to 31, 2024 from 10 a.m. to 12 p.m. > 2 p.m. to 6 p.m.
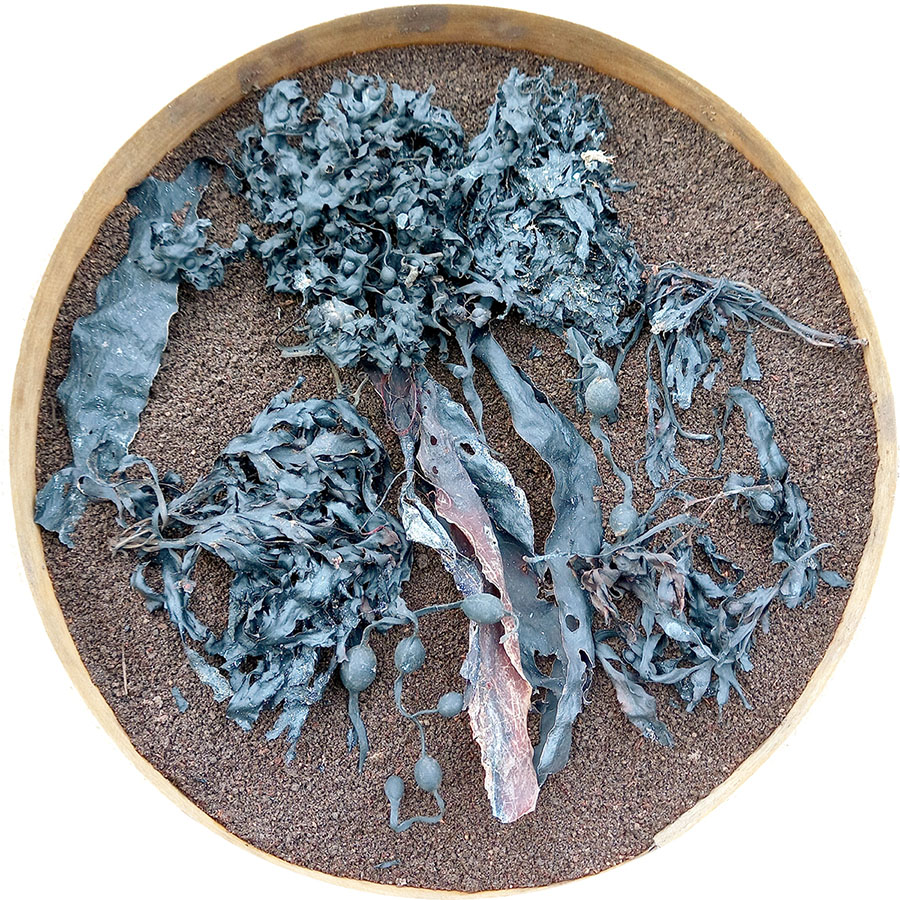
Litiere forestieres feuilles chene hetre charme Foret de Roumare 2023
Ed: many thanks to Pacal and Roselyne for sharing details of their exhibition in Cahors and sending the images shown on this page. Here’s to Humus miraculum, and all things botanical!
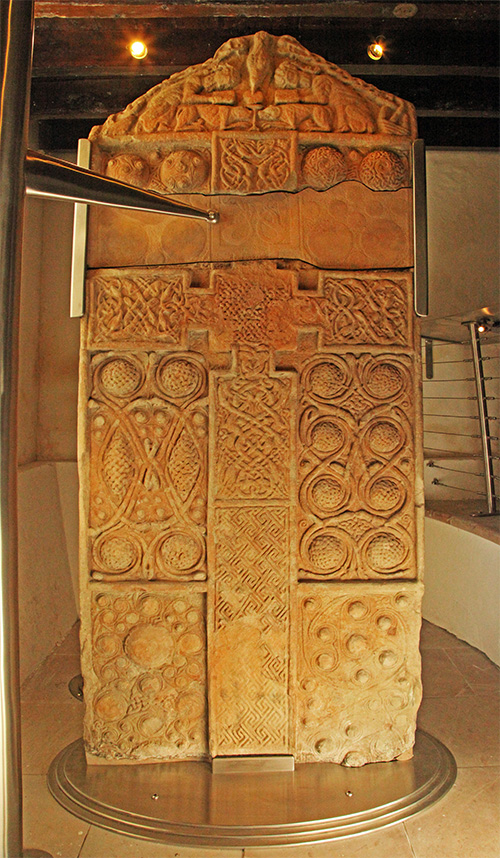
I think it was the great sculptured stone of Nigg that did it…… How could someone have carved a stone of that size, with such intricacy, such imagination and such skill with just a hammer and chisel? And 1200 years ago?
The Pictish cross-slab in Nigg Church, Tarbat (www.livingfield.co.uk)
So that was how I became hooked on Pictish sculptured stones. I visited Tarbat Ness in Easter Ross and the beautiful little museum in St Colman’s Church at Portmahomack [1] to find more examples and history retold as a story. Martin Carver of York University began fieldwork on the site in 1994 [2]. The team uncovered extensive monastery grounds near a stone church probably dating from the 8th Century, with evidence of metalworking and vellum making but also many carved stones, all in pieces.
The evidence of vellum making indicates that a scriptorium (place for creating manuscripts and illustrated gospels) was in existence at that time. There is discussion at the moment too, as to whether the ‘Book of Kells’ [3] could possibly have been created, in part perhaps, at the monastery of Portmahomack. If true ……..now there’s a legacy!
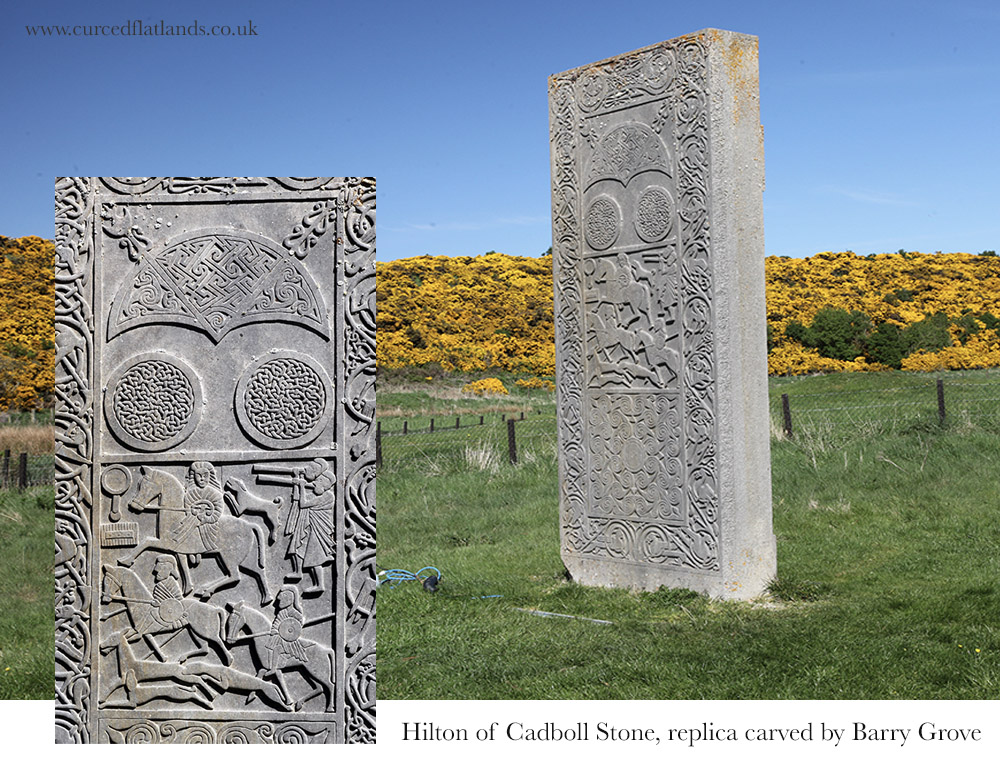
From there, I visited the other great Pictish sculptured stones of Tarbat Ness – the Hilton of Cadboll Stone and the Shandwick Stone [4]. There is a replica of the Hilton of Cadboll Stone, carved by Barry Grove [5] and now in its original position. The actual Stone is in the National Museum of Scotland in Edinburgh. The Shandwick Stone is covered by glass and is therefore protected from the elements, in place in the village of Shandwick. The Parish Church of Nigg houses the Nigg Stone, without glass, and it is the original – not a replica – and it is amazing!
Once I had seen these huge sculptured stones I began to find out more about both the Picts and their stones. Eastern Scotland is rich in its Pictish Stones, as is Morayshire, and there are so many to see, some in situ and some in museums. Some are well-protected but many are not – they are still in fields without even wooden structures to protect their artistry and their story. They are vulnerable to rain, snow, changing temperatures and the farmer’s plough.
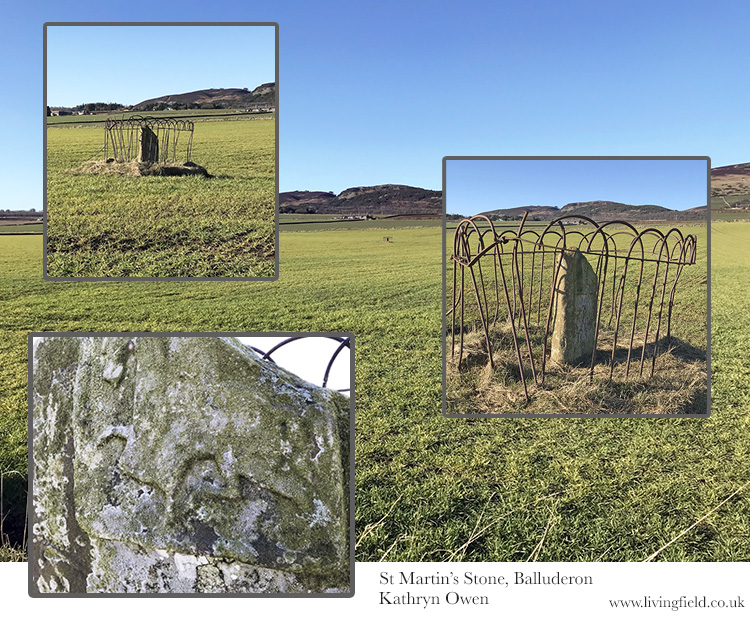
The stone in the photograph below, called St Martin’s Stone, is still in a field at Balluderon, Angus, exposed to the elements, and the sculpted figures and beasts are very faintly seen. This monument, was created 1300 years ago but seems to be no longer respected as significant in 2022. The damaged rusty fence constructed around it may protect it from the plough or tractor, but not the weather. Should we not be doing more to protect these stones?
Iconography
I began seeking out Pictish Stones, taking photographs of the stones and their sites and recording the iconography of the stones. The stones have a wide range of symbols and strange motifs, of key patterns, or interlaced knotwork, of figures – many on horses, some clerical, some warriors, some musicians, and then there are the beasts! There are entwined sea horses, strange dragon-like animals, birds like eagles or ravens, angry limb-eating monsters and also the ‘Pictish Beast’. This beast is strange – it has a snout like a dolphin, a crest or mane like a horse, four weird appendages which could not really be called legs or fins and then a tail! It has sometimes been called the ‘elephant beast’, maybe because of its large trunk-like head.
One of my projects was to find as many Pictish Beasts as I could, photograph and draw and paint them. There is evidence that the stones had been painted after they had been sculpted. The colours of the paint would have been the basic dyes available to the sculptors at the time (e.g. woad, madder etc.). I like to think of my pictish beasts as being somehow toned with the blues, greens and yellows that remind me of sea reflections. I suppose I do see the pictish beast as a water animal but this is just an intuitive feeling about it! I have drawn about 10 beasts so far and there are about 50 odd altogether – so I have a long way to go.
Here are some of the ones I have completed so far, with details of the stones, where they can be found and any interesting points about them.
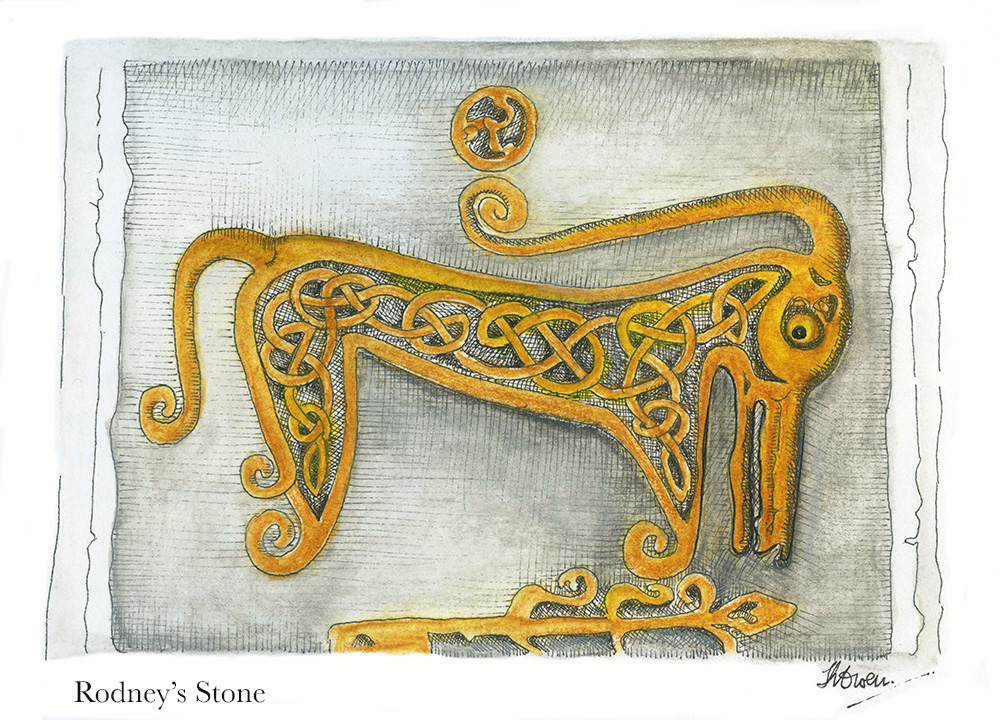
Rodney’s Stone – Brodie Castle in Morayshire
Rodney’s stone is a 2 m high cross slab located on the approach to Brodie Castle, originally found in the grounds of the old church of Dyke and Moy nearby. There is also an inscription in ogham alphabet [6] on the stone and this contains the name ‘Ethernan’ who was a Pictish Saint.
Note that the Pictish beast has ornate interlacing on its body, not that usual.
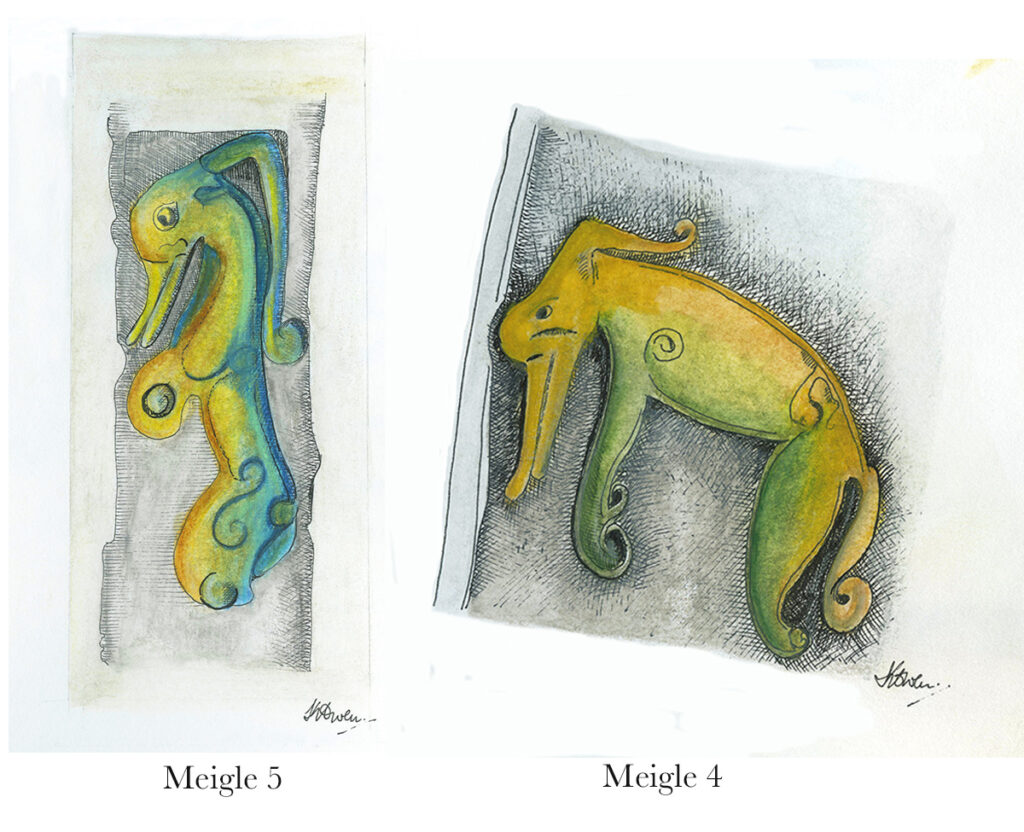
Meigle, Perthshire
There is a great museum in Meigle in the former Parish School built in 1844 [7]. There is archeological evidence of an early church or monastery from 9th century. There are 27 Pictish stones and about a third of them are magnificent cross slabs and the stones are each numbered [4]. This Pictish beast (left below) is found on the side panel of Meigle 5 and looks fairly amused. The other – the grumpy one – is found on the reverse of the stone called Meigle 4.
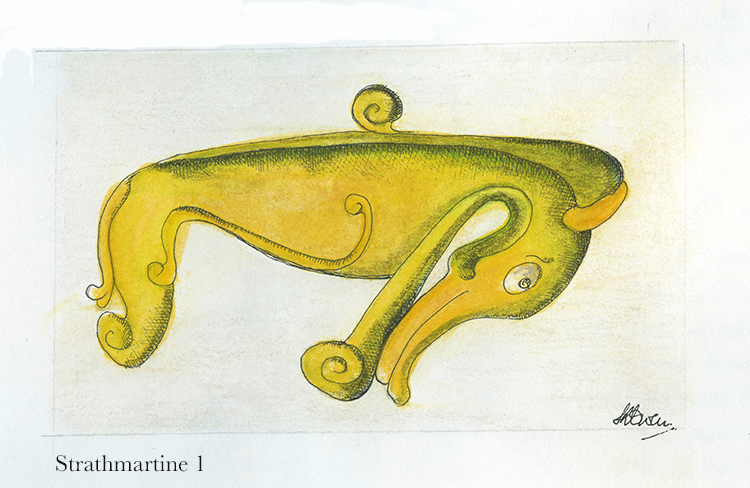
Local Stones – McManus Museum, Dundee
There have been a number of Pictish Stones found around Dundee and in Angus. I visited the local McManus Museum and also the Meffan Institute in Forfar [8] and was delighted to see the large number of stones on display. Strathmartine is an area of Dundee to the north west of the city where stones have been found on farmland. A pictish beast is found on Strathmartine 1, 3 and 6 [4]. This one is Strathmartine 1 and was found in a field between Strathmartine Castle and Gallow Hill.
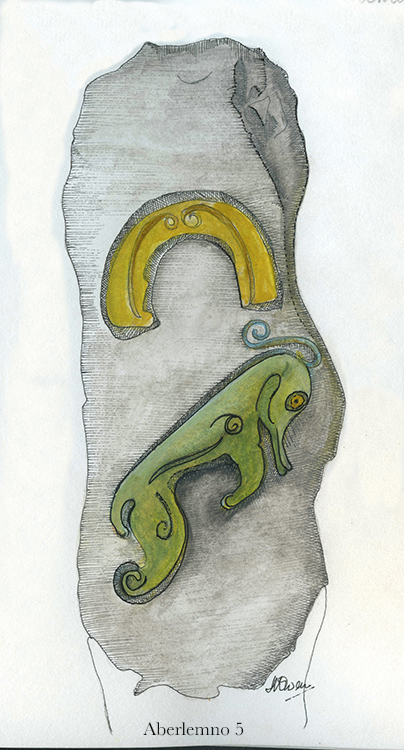
Aberlemno, Angus
This stone of a pictish beast with a horse shoe above it was found in Aberlemno in the 1960s, again in a field. Aberlemno has a collection of outstanding Pictish stones, simply standing at the side of the road and in the grounds of the parish church. Another stone has recently been found in a nearby field during an archeological dig by Aberdeen University. A visit to Aberlemno really is inspiring to see these stones in situ, along the roadside and in the graveyard of Aberlemno Kirk [9].
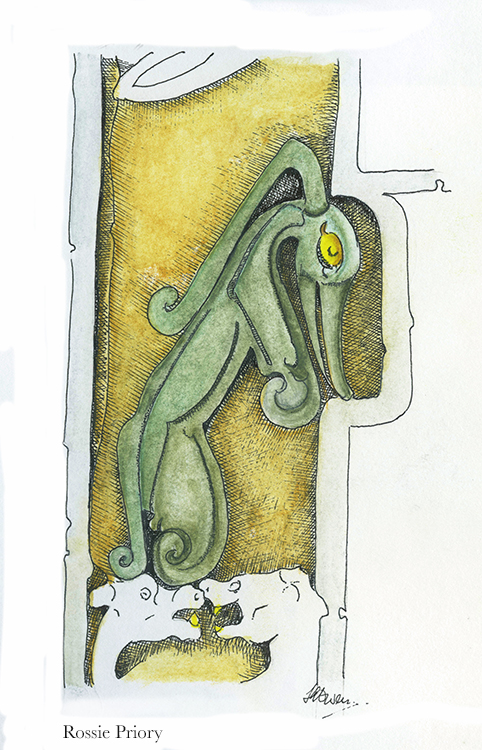
Rossie Priory, Perthshire
The Rossie Priory Stone in Perthshire is protected in a family mausoleum. It is another highly carved, ornate and artistic stone and this beast is part of it. The heads below the beast are of a two-headed dog.
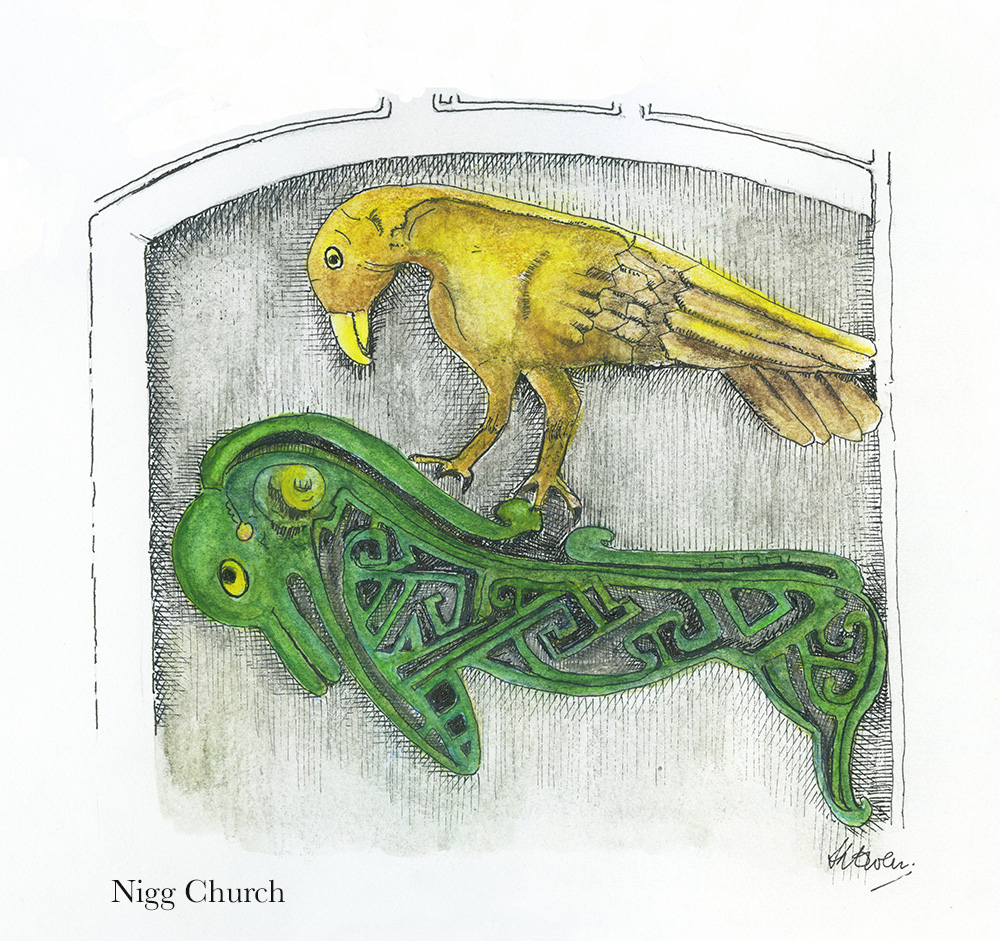
The Nigg Stone, Easter Ross
The Nigg Stone was broken in the 1800s when it was being moved and later repaired with a steel frame and an insert. The missing part on the reverse side of the stone had a Pictish beast and bird sculpted upon it. We know this from a drawing by Charles Petley in 1811/12.
I attempted to recreate this image of the beast from faint sketches found on Canmore [4] and in the Tarbet Ness Discovery Centre at Portmahomack [1], but also added in the interlacing that was in the original. I have found, so far, only two pictish beasts that contain interlacing and these are Rodney’s Stone and Nigg Stone. My drawing (below) shows an eagle above the beast and there are other stones where an eagle is below a pictish beast. There seems to be a relationship between these two – the eagle and the beast – but what?
More to be found
There are more pictish stones being discovered by various enthusiasts and professional archeologists as we move through 2022 into 2023. Recent finds include those at Aberlemno in 2021 [9] and Kilmadock in September 2022 [10].
Pictish Hill Forts are being futher excavated such as those at Burghead in Moray [11] to reveal great fortifications and more Pictish artifacts.
I hope more pictish beasts will be revealed but I have a long way to go to photograph, draw and paint all of them. Maybe I will not finish the task, but it’s a fascinating project so far!
Finally, details of the various beasts, the beautiful interlacing and key patterns can be found in the book by George Bain [12]. Bain describes and draws detail from Hilton of Cadboll, Shandwick and Nigg Stones but also instructs and guides readers into the art of Celtic design and construction. This is a great book for anyone wanting to learn more about the art of celtic drawing.
Sources | links
[1] St Colman’s Church is now the site of the Tarbat Discovery Centre, Portmahomack, Easter Ross, which gives history of the site and wider area, and displays stones found locally.
[2] Portmahomack Monastery of the Picts, 2nd edition 2016, by Martin Carver. Edinburgh University Press.
[3] Book of Kells: see Trinity College Dublin at Shine a light on Irish history and the National trust for Scotland at The Book of Kells. The possibility that the Book could have been produced at an eastern Scottish monastery is considered by Victoria Whitworth (link to the Tarbat Discovery Centre).
[4] Photographs, drawings and information on Pictish Stones can be found by searching the Canmore web site (National Record of the Historic Environment) and in books, for example: Allan, J. Romilly and Anderson, J. 1903. The early Christian Monuments of Scotland, Vols 1 and 2. Society of Antiquaries of Scotland, Edinburgh. Numbering of the stones, useful where several are found or exhibited at the same site, usually follows that set by Romilly Allan.
[6] Ogham – an early mediaeval alphabet from Ireland. See the web sites: OG(H)AM for a current research project; articles by David Stifter, Maynooth University, e.g. Language and epigraphic culture ‘OGAM’; and ogham.co for history, symbols and translations.
[12] Celtic Art The Methods of Construction, by George Bain, Constable and company first impression 1951.
Editor: many thanks to Kathryn Owen for sharing her experiences and drawings of Pictish Beasts. Pictish art is a legacy of global significance, originating in our croplands but appreciated far beyond.
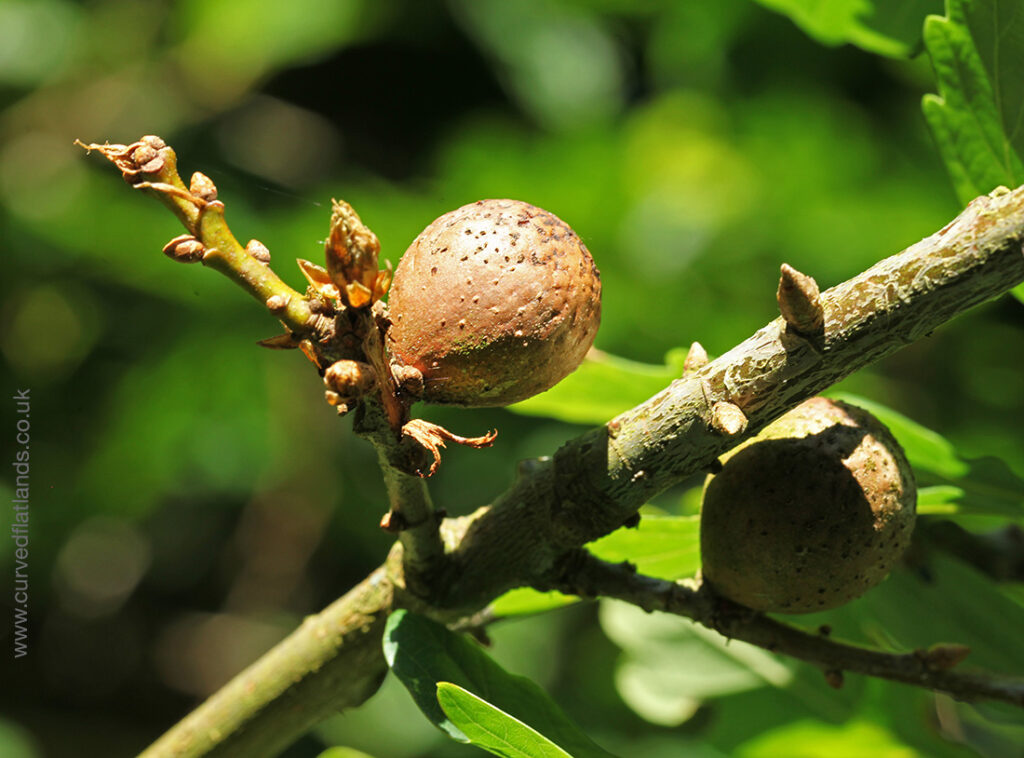
Oak galls are small spherical growths that form on oak trees where the gall wasp lays its eggs in the buds of the tree. The tree grows tissue around the egg which protects the wasp until it hatches, leaving a hole. Watch out for a hole in the gall before harvesting.
The end of the summer is a good time to harvest, I find the galls are easier to spot once the leaves have fallen. If you can’t find them, you can buy oak gall powder/whole oak galls online [1].
Drawing Ink
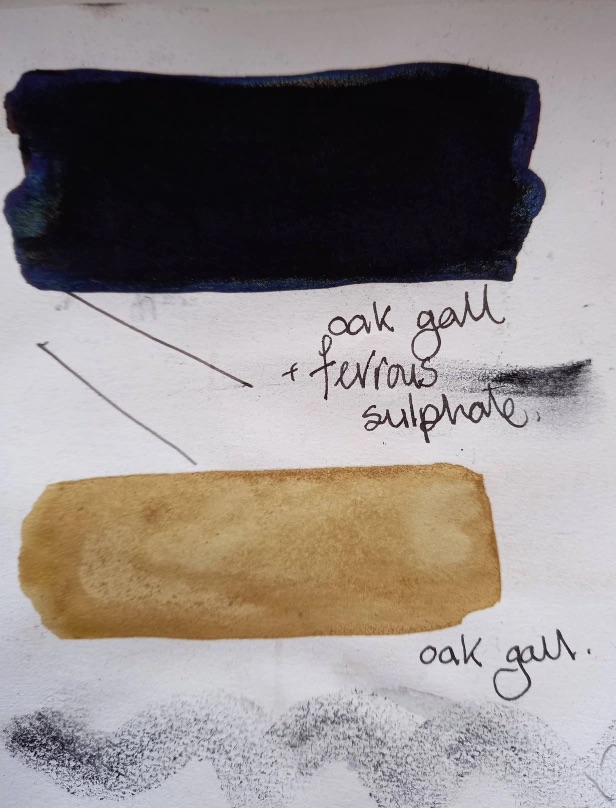
With the addition of iron, oak galls make a permanent ink. The method involves a reaction between tannic acid extracted from the galls and ferrous sulphate. The ink would once have been used with a quill and later a dipping pen.
Oak gall ink can still be seen on early manuscripts, though many are damaged due to the acidity of the tannic acid, which eats away at the natural fibres of paper, parchment or vellum [2]. To avoid such damage, recipes now use less ferrous sulphate.
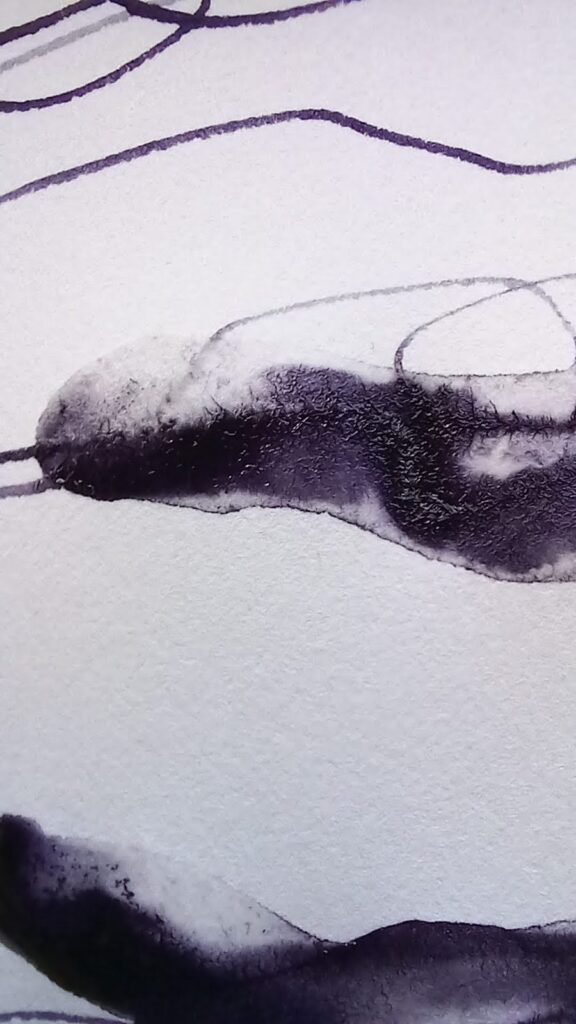
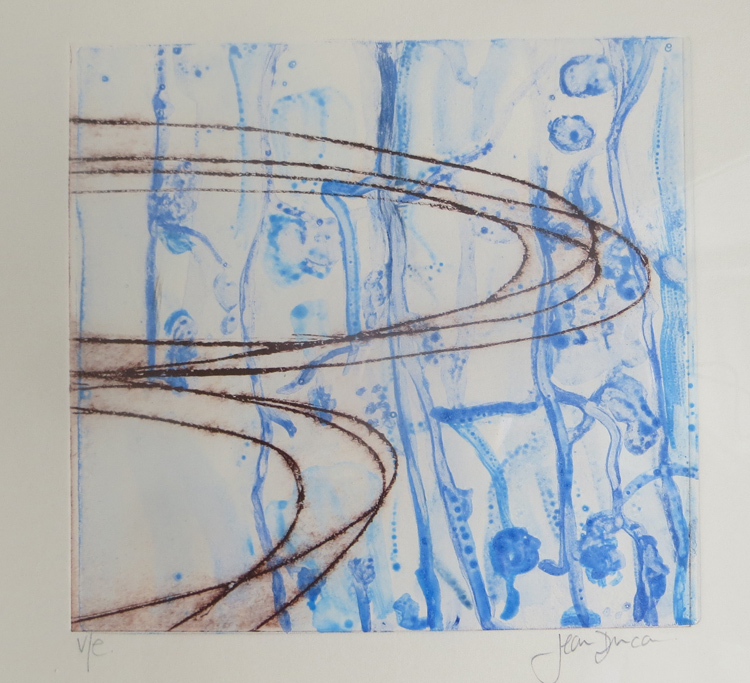
Wet oat gall ink on paper (Jean Duncan)
Recipe This makes 250 ml of ink.
To make a permanent oak gall ink you will need ;
30 g of whole oak galls or oak gall powder.
Pestle and mortar
Scales
Rain water
Muslin
15 g ferrous sulphate powder *
7 g gum arabic solution
Glass jar for storage.
*Can be purchased as blue green crystals or white powder.
Colour from oak galls can be used alone, but the addition of ferrous sulphate makes the ink permanent and black (Jean Duncan)
Method
Crush the oak galls with a pestle and mortar or put them in a bag and mash them with a hammer.
Add 30 g oak gall powder to 25 ml of water and leave to soak for 24 hrs.
Strain the liquid through the muslin.
Mix the ferrous sulphate into the strained solution.
Add the gum arabic and stir well
Add oil of cloves or any other essential oil to help it keep for longer and store in the fridge.
Try using the ink with a pen and a brush to see that it flows well, if the ink has a dusty surface add more gum arabic.
It is worth experimenting with washes of ink, as it turns blacker when it reacts with oxygen from the air.
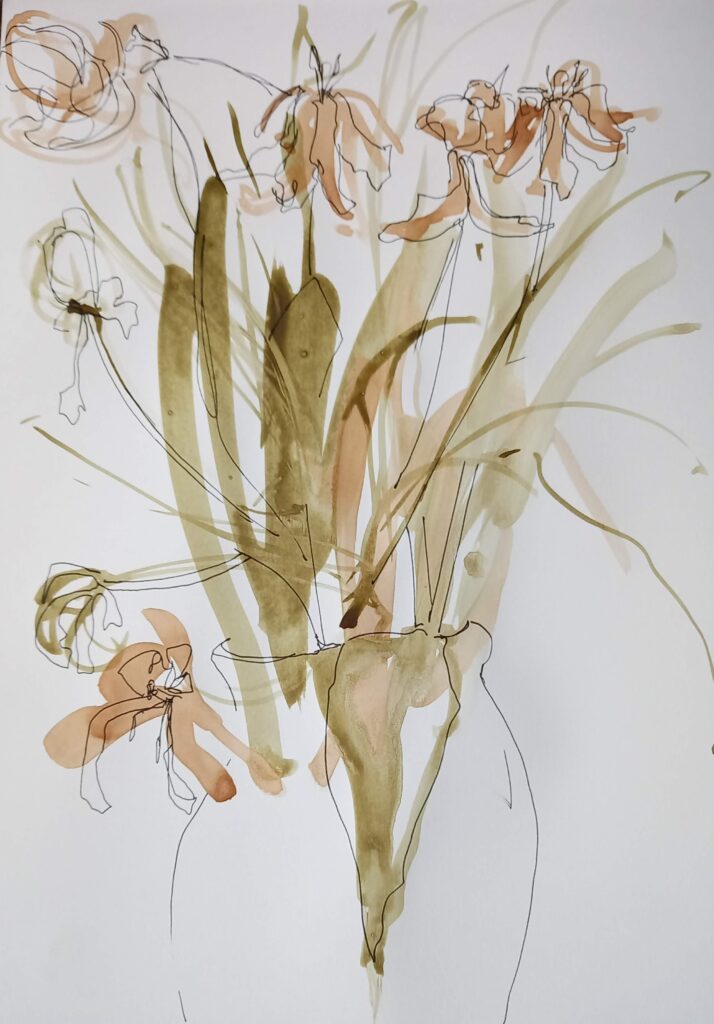
Oak gall ink reacting with barley ink made from orzo coffee grounds (Jean Duncan)
I wanted to make my own inks and watercolours to help create a sense of place in my drawings through botanical colours from my local environment, while consciously moving away from synthetic printing colours which are often unpleasant to use, toxic and harmful to people and the environment.
The photograph above shows a blend of colours produced on paper by oak gall ink and barley ink, the latter from orzo, a caffeine-free drink made from barley.
Colours from oak gall, onion skin and coreopsis – drawing by Jean Duncan
There are many artists and artisans working in this way and small businesses are leading the way in using locally sourced materials and natural dyes to make cloth that at the end of it’s life can be put back into the earth as a biological nutrient rather than a pollutant. I have given links below to two Fibreshed businesses working in this way [3, 4] and to an article on making ink from up-cycled coffee grounds [5].
Sources | Links
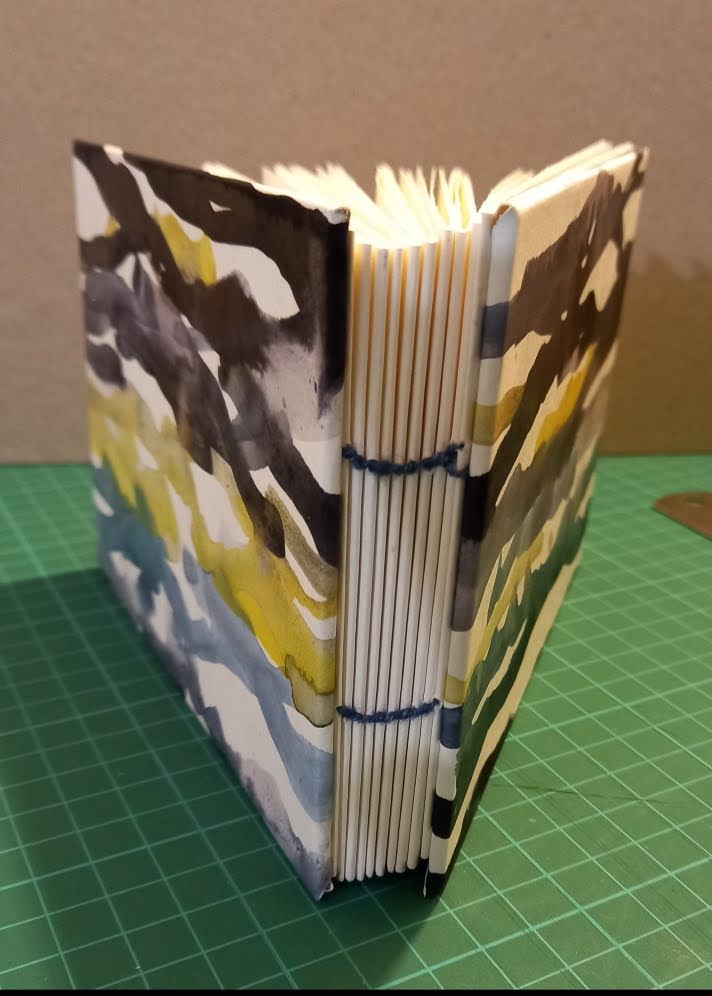
Hand-bound sketchbook with oak gall, indigo and ochre cover
[1] To buy oak gall ink: George Weil fine art and craft supplies.
[4] More Fibreshed – Wool from the border between the Yorkshire Dales and Cumbria, : Laura’s Loom.
[5] European Horizon magazine: Eco espressso and upcycled inks set to make coffee greener. Some interesting facts in this article: black printing ink is more expensive than Chanel No 5, and the daily ‘waste’ in coffee grounds is equal to the weight of three Eiffel Towers!
Jean Duncan is based in Fife. See her web site at JeanDuncanArtist. Jean has worked with the Living Field on many projects, exhibitions and events – her work is profiled at this Living Field page.
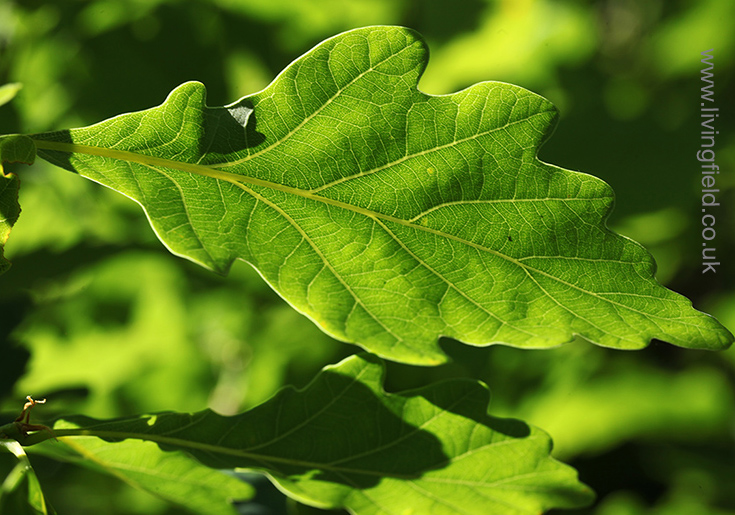
The photographs below are of an oak gall and oak leaf from the Living Field collection
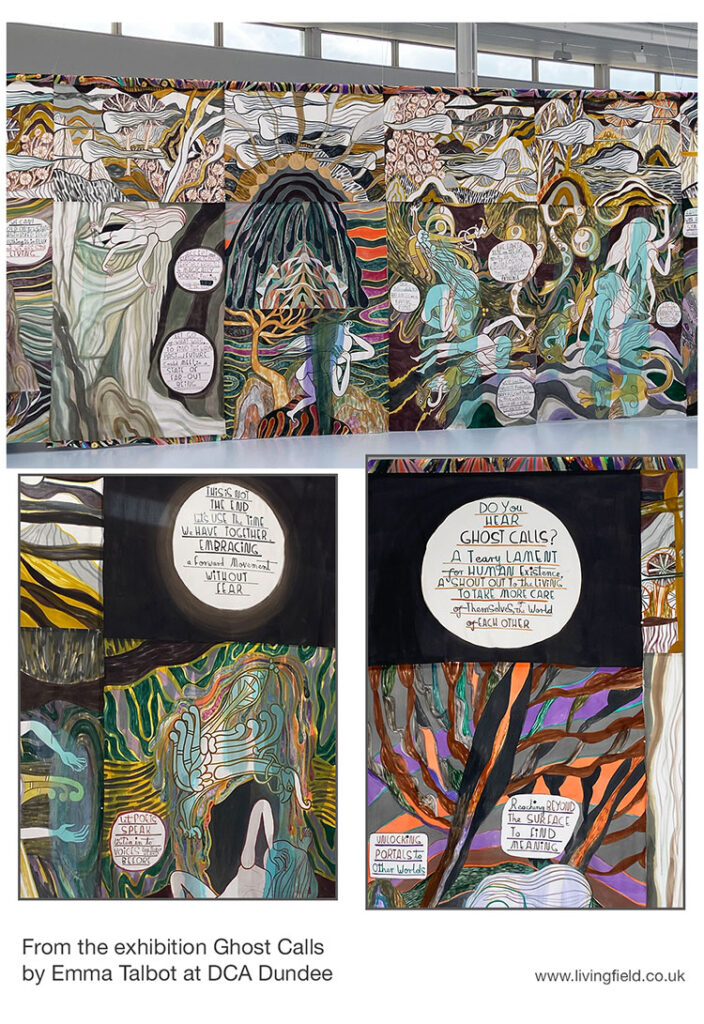
This remarkable, unique exhibition is open at Dundee Contemporary Arts from 28 April 2021 to 8 August [1].
Main works include Ghost Calls (2020), a large painting in acrylic on silk (parts shown in the photos below), the mesmerising Keening Songs (2020) – an animation of over 14 mins (hard to describe) and A Crash in Fast and Slow Motion (2020), again acrylic on silk.
In Ghost Calls female forms occupy and move through a landscape. Intense colour contrasts with the greys of the figures and with shapes containing words describing how things are and where we might go.
Perhaps in relation to A Crash … , the author writes [2] “Against the backdrop of the ecological disasters of our age, I feel increasingly like we were passengers in a vehicle being driven recklessly round a blind corner, headed for some massive smash up.’
Those of us who see ecological destruction and human misery can’t help but connect with what we see here. Yet the artist offers a way forward. First, it helps to grieve, to keen.
Then to imagine. From the book of the exhibition [2]: “Talbot imagines future environments where humankind has been flung out of a capitalist-driven society of digital technologies and must look towards more ancient and holistic ways of crafting, making and belonging”
And then to act – at the end of Ghost Calls are the words: ‘This is not the end | let’s use the time we have together | embracing | a forward movement without fear’.
Britain’s environment has been irreversibly changed. The rainforest has almost gone, soils are being lost, rivers are still polluted, so much life has been made extinct. Yet there is still the need to re-group and re-form, to make the best of the land, soil and living things, those remaining and those introduced. Where’s the alternative.
You must see this exhibition.
From a Living Field correspondent visiting the exhibition on 19 May 2021.
Further
[1] Exhibition Notes: Ghost Calls by Emma Talbot. Dundee Contemporary Arts, 152 Nethergate Dundee DD1 4DY
[2] Ghost Calls. Emma Talbot. 2021. Artist and various authors. Book published as part of the exhibition. Dundee Contemporary Arts.
This year, as a 3rd year Contemporary Art Practice student at Duncan of Jordanstone College of Art & Design (Djcad), Dundee and with the support and encouragement of Geoff Squire & Gladys Wright (& Pete Iannetta who pointed me in the right direction) I was introduced to the Living Field at the James Hutton Institute, Invergowrie and ran my plant-printing workshop as part of the Open Farm Sunday event.
Studio and exhibition space
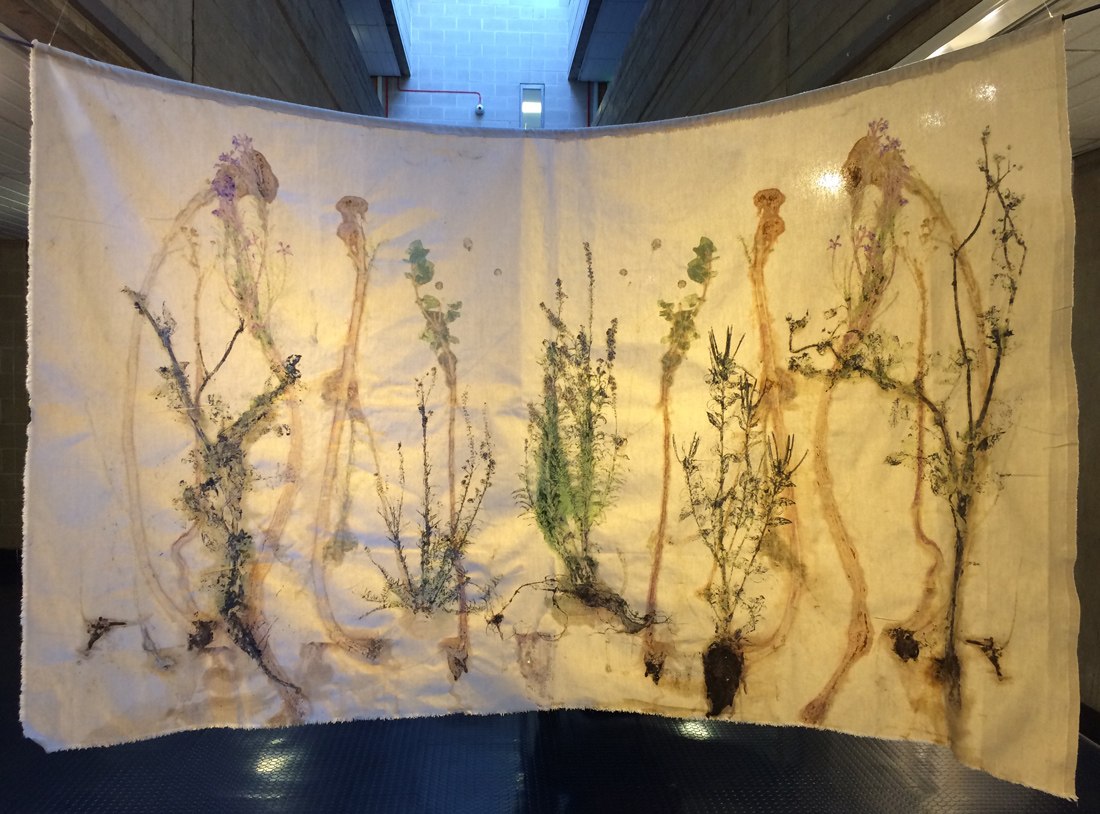
My work concerns wild plants (and those often considered to be weeds) and the soil in which they grow. I currently work mostly in printing where I have developed a number of plant printing techniques. I also make ‘earth’ paintings, and work in ceramics, photography, and laser cutting. I would be very interested to hear from any scientists who might be interested in this work, have comments, or who might want to collaborate with me, particularly in context of the blue pigment; in making the prints lightfast; or the possibility of employing these printing techniques as a scientific tool.
Edaphic Plant Art
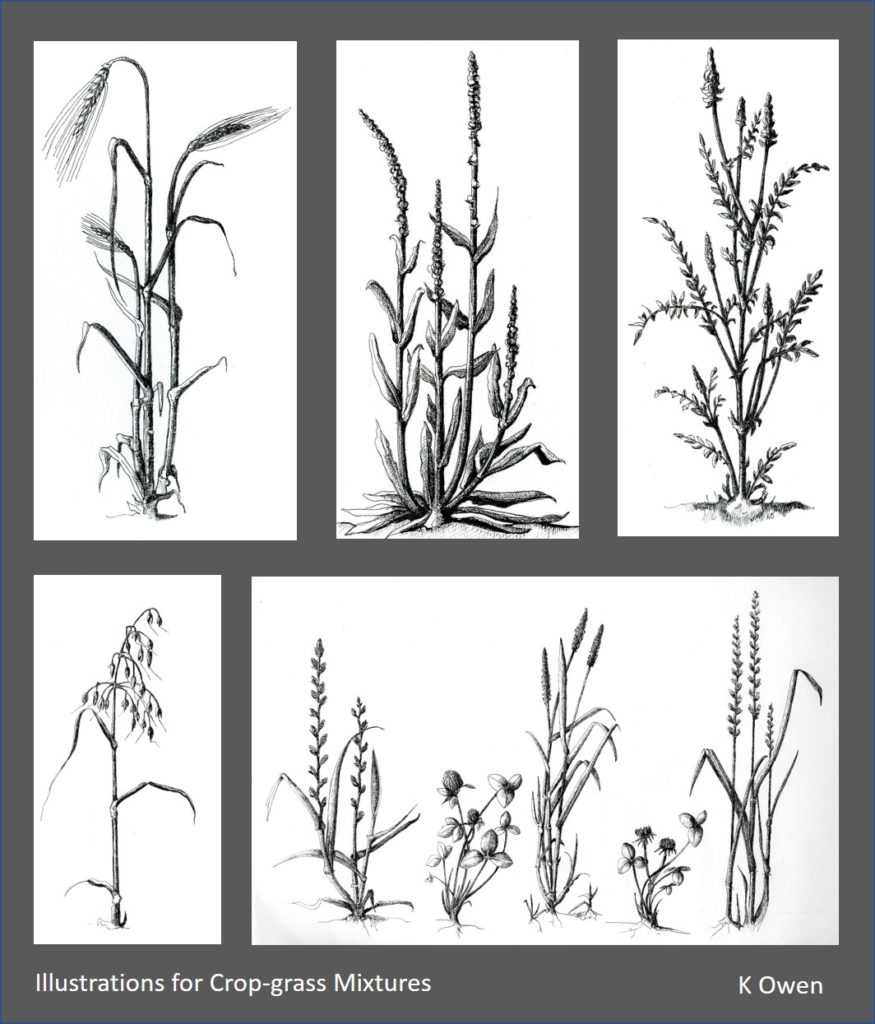
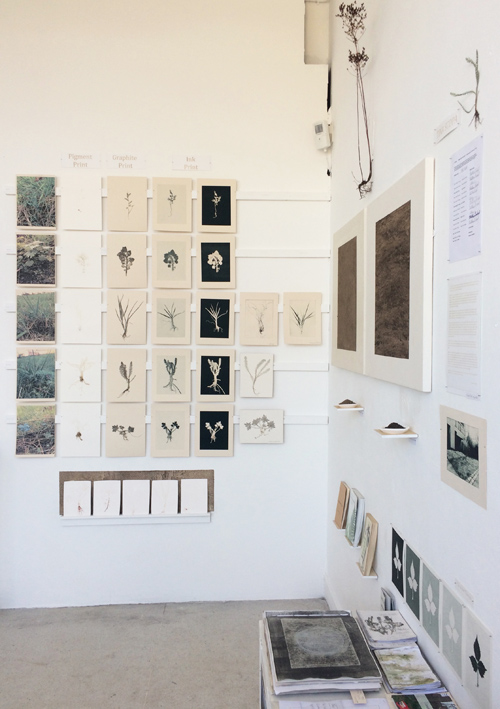
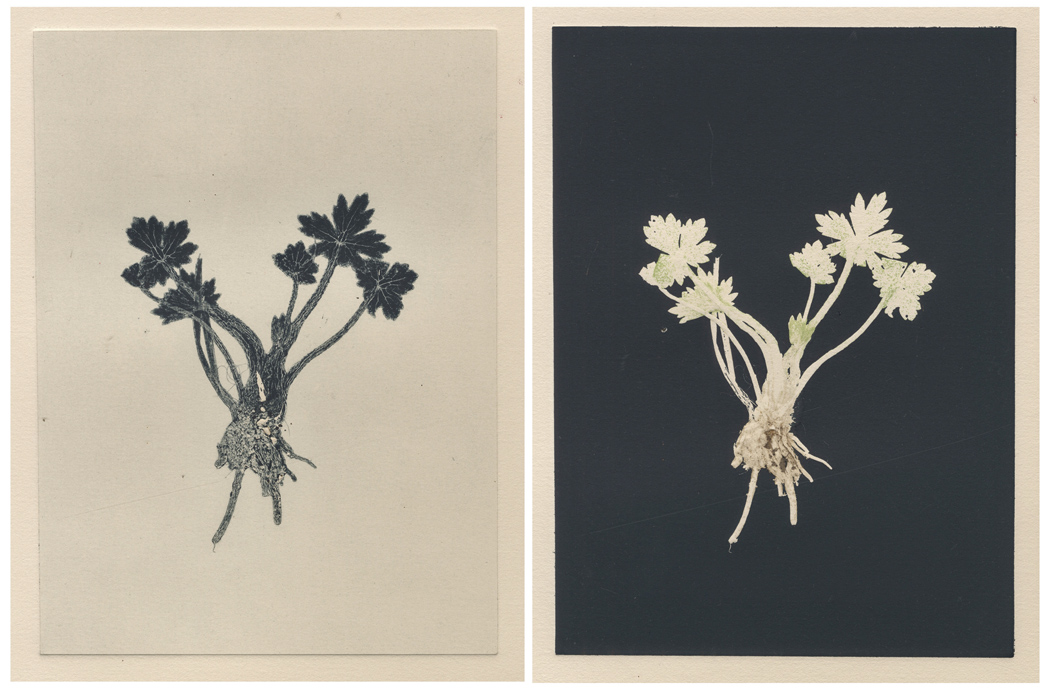
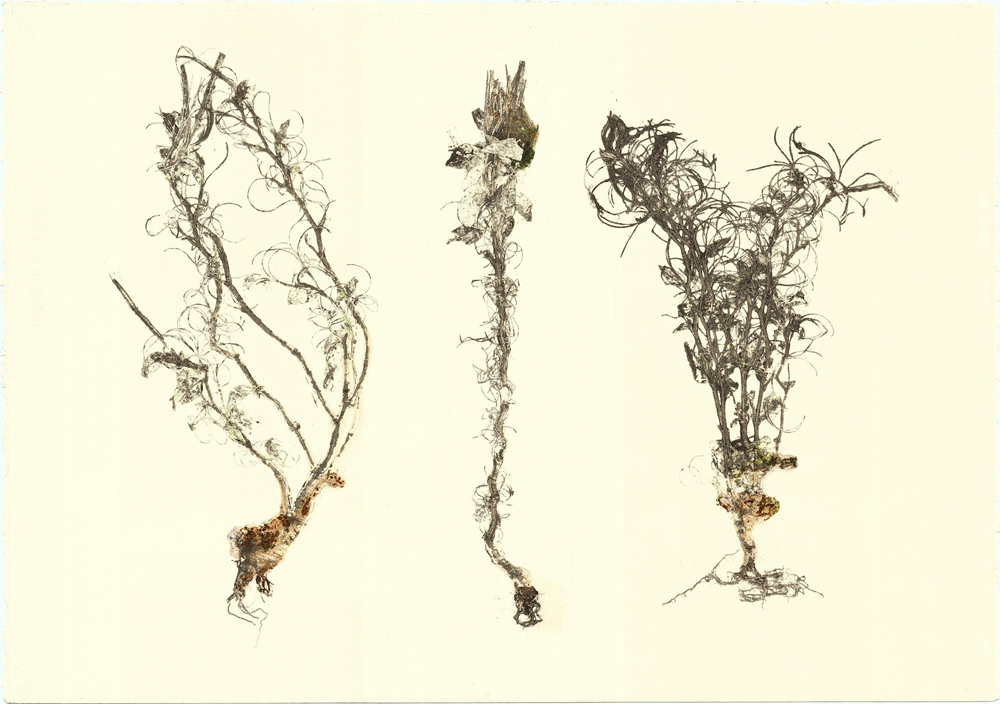
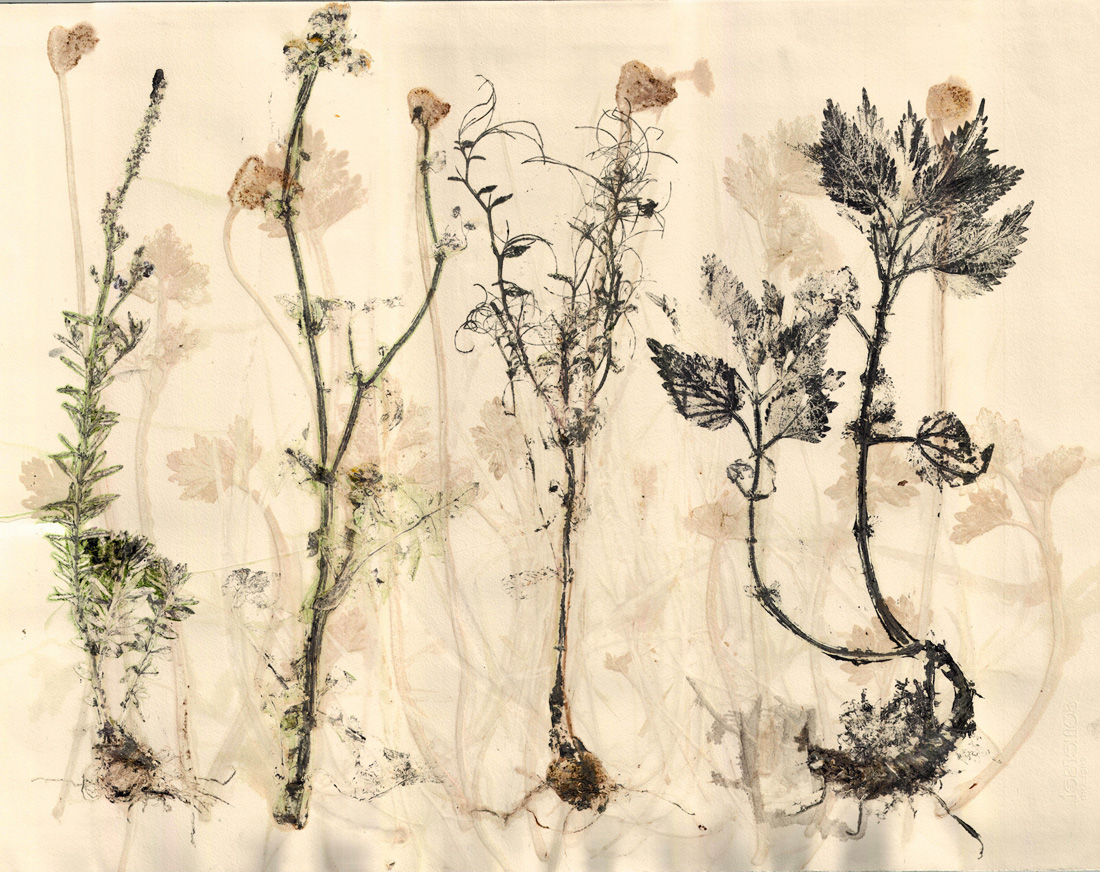
In my most recent work I coined the term, Edaphic Plant Art. This body of work was concerned with a small patch of grass on campus. I was interested in the variety of wild plants growing on this patch and also in the soil in which they were growing. I focused on 5 plant varieties and attended soil science lectures. I documented these plants by using 3 different plant-printing techniques that I have termed, the Pigment Print; the Graphite Print; and the Ink Print.
These prints were presented on the wall in a grid format together with digital print photographs of the plants. Porcelain tiles were also prepared for each plant. In addition ‘earth paintings’ were made using soil taken from the site and ‘healthier’ soil taken from another site. Besides each painting a soil sample was presented in a hand made porcelain cup.
Weeds
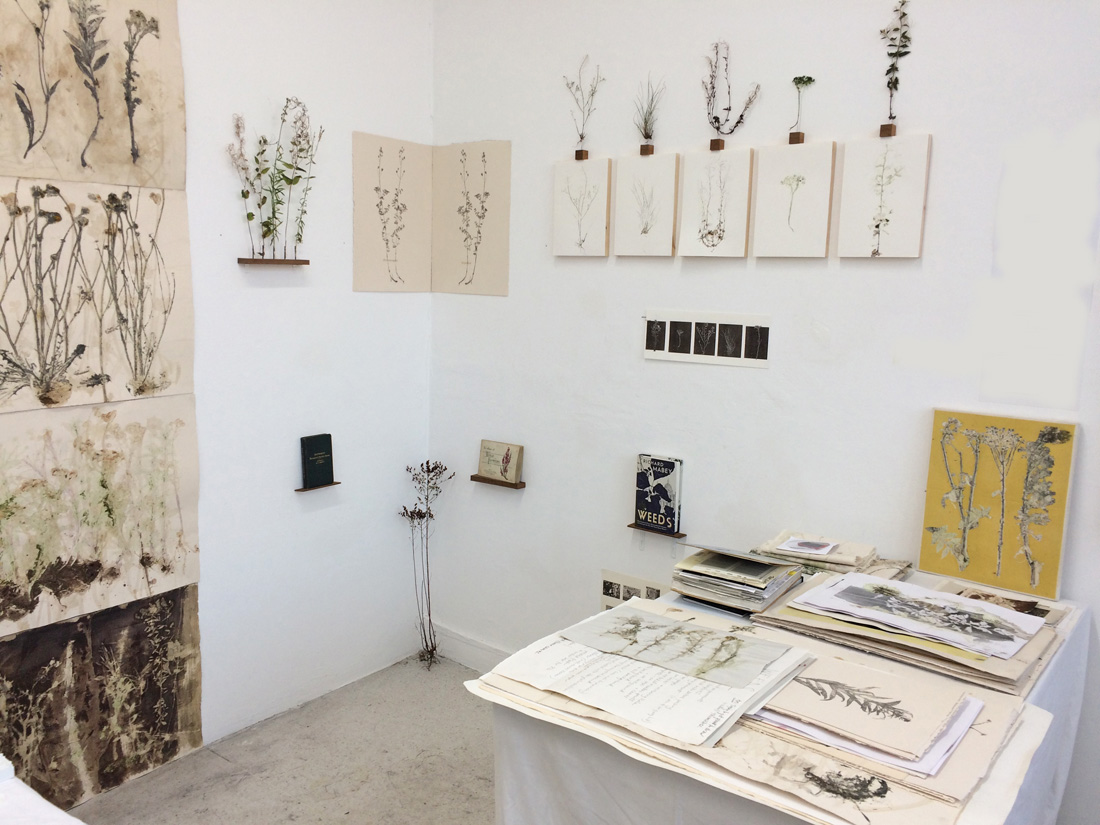
This body of work began with the initial desire to get plants to ‘draw’ themselves. The plants used were those largely considered to be ‘weeds’. The method used to develop this idea has primarily been experimental printing. Experimental photography techniques were also been employed to a lesser extent, as were small sculptural works.
Through the process of experimentation and subsequent development the goal was considered to have been accomplished.
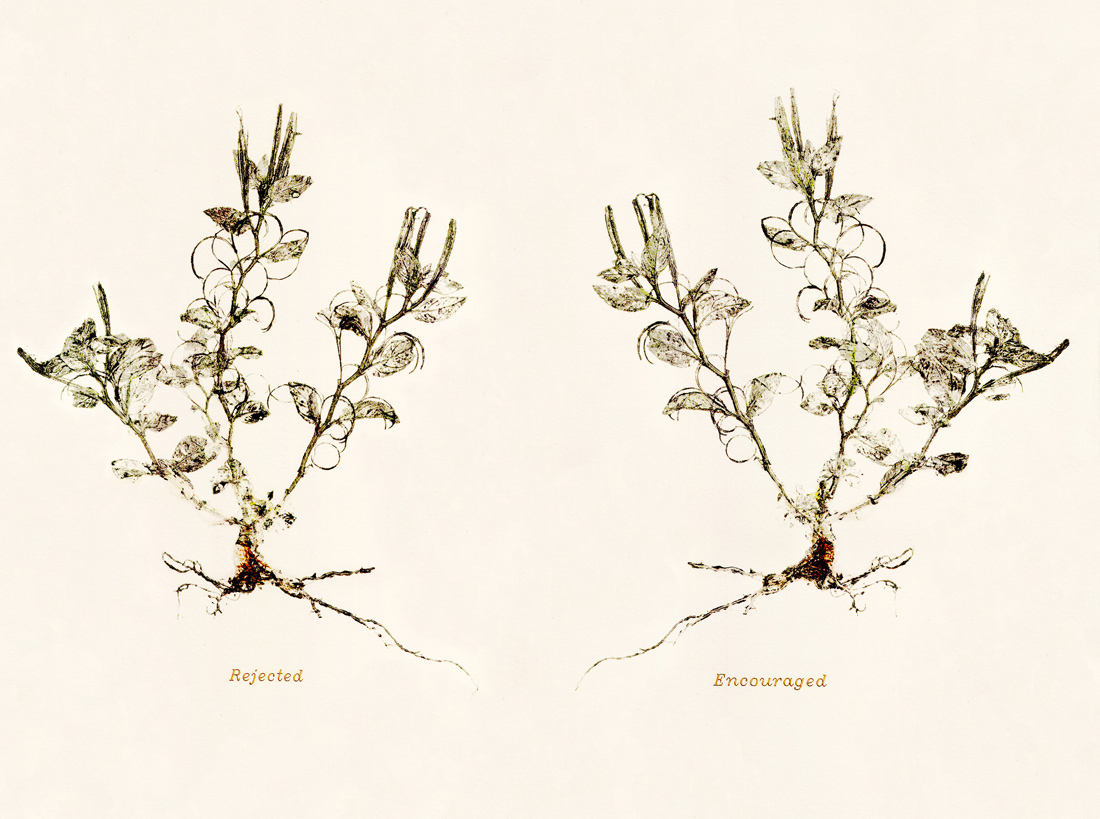
The resulting plant ‘drawings’ were able to convey the inherent beauty of these weed forms and the individual ‘character’ of each plant. In addition, the body of work was presented as a metaphor for our own human condition, commenting on different aspects of ourselves.
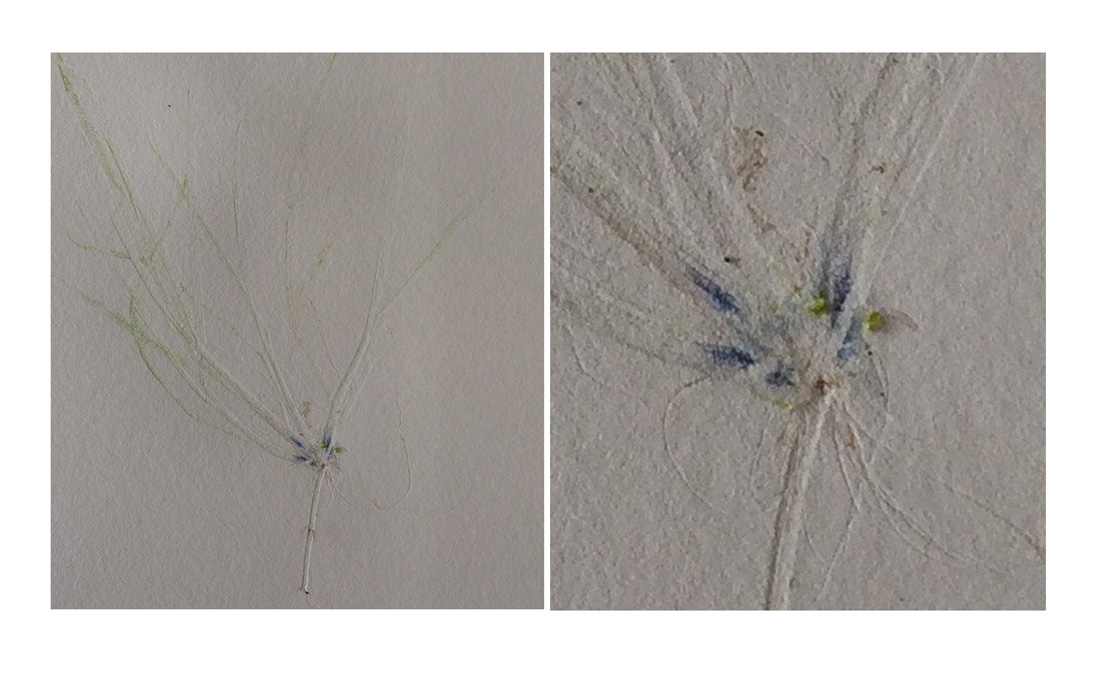
The Blue Pigment
Over the course of developing my Pigment Prints I have often noticed a very blue pigment located just where the stem meets the roots in certain grasses. If anyone can shed light on this I would be very grateful and would love to extract this in the lab.